


WordPress integration
Introduction
As a business owner, you know how important it is to engage your customers and increase sales. One effective way to do this is by offering digital gift cards or vouchers. With VaocherApp and WordPress integration, you can easily create, distribute, and manage digital vouchers on your website, streamlining your sales process and boosting customer engagement.
By integrating VaocherApp with WordPress, you can add digital gift cards as a sales tool on your website, making it easy for your customers to purchase and use vouchers.
Benefits of VaocherApp and WordPress Integration
Integrating VaocherApp with WordPress can offer several benefits for your business:
- Boost sales: digital gift cards are a popular gift option, and offering them on your website can increase sales and revenue.
- Streamline your sales process: with digital vouchers, there’s no need for physical cards or manual tracking. Everything is managed through VaocherApp and WordPress, saving you time and effort.
- Improve customer engagement: offering digital gift cards can help you engage with your customers and encourage repeat business.
- Customisable branding: with VaocherApp, you can customize the design of your vouchers to match your branding, making them more visually appealing and memorable.
How It Works
After you’ve installed and set up the VaocherApp plugin into your WordPress website, you will be able to embed VaocherApp checkout into your WordPress page. This is where your customers will place orders.
When someone makes a purchase, VaocherApp will handle sending receipt to purchaser, sending gift voucher to recipient… If your WordPress site has WooCommerce plugin enabled, the purchased gift voucher will be pushed to your WooCommerce so later on your guests can redeem the voucher in your WooCommerce store.
All of that happens automatically behind the scene, you don’t need to spend time copying and managing gift vouchers anymore.
How to Integrate VaocherApp with WordPress
To integrate VaocherApp with WordPress, you can use the VaocherApp WordPress plugin. Here’s how to get started:
1. Install the VaocherApp WordPress plugin:
- Log in to your WordPress admin dashboard
- On the left sidebar, click Plugins
- Click Add New
- Search for “VaocherApp” and install the plugin
- Click Activate
✨️ Alternatively, you can manually install the plugin:
https://wordpress.org/plugins/vaocher-app/
2. Set up WordPress plugin
Once installed and activated the plugin:
- Go back to your WordPress Plugins page by clicking on the “Plugins” menu on the left sidebar
- Find the “VaocherApp” plugin on that page, click on the “Settings” button (see screenshot below)

3. Connect your account
The first time when you visit VaocherApp plugin page, you should see something like this:

Just follow the instruction on that screen, click “Create New Account” button on the left
- If you already had a VaocherApp account, click the right button “Connect to VaocherApp”
- Otherwise, click “Create New Account” button on the left
The page will redirect you back to VaocherApp dashboard to finish the setup.
ℹ️ While being redirected, don’t close the browser or navigate back. Everything should be handled automatically.
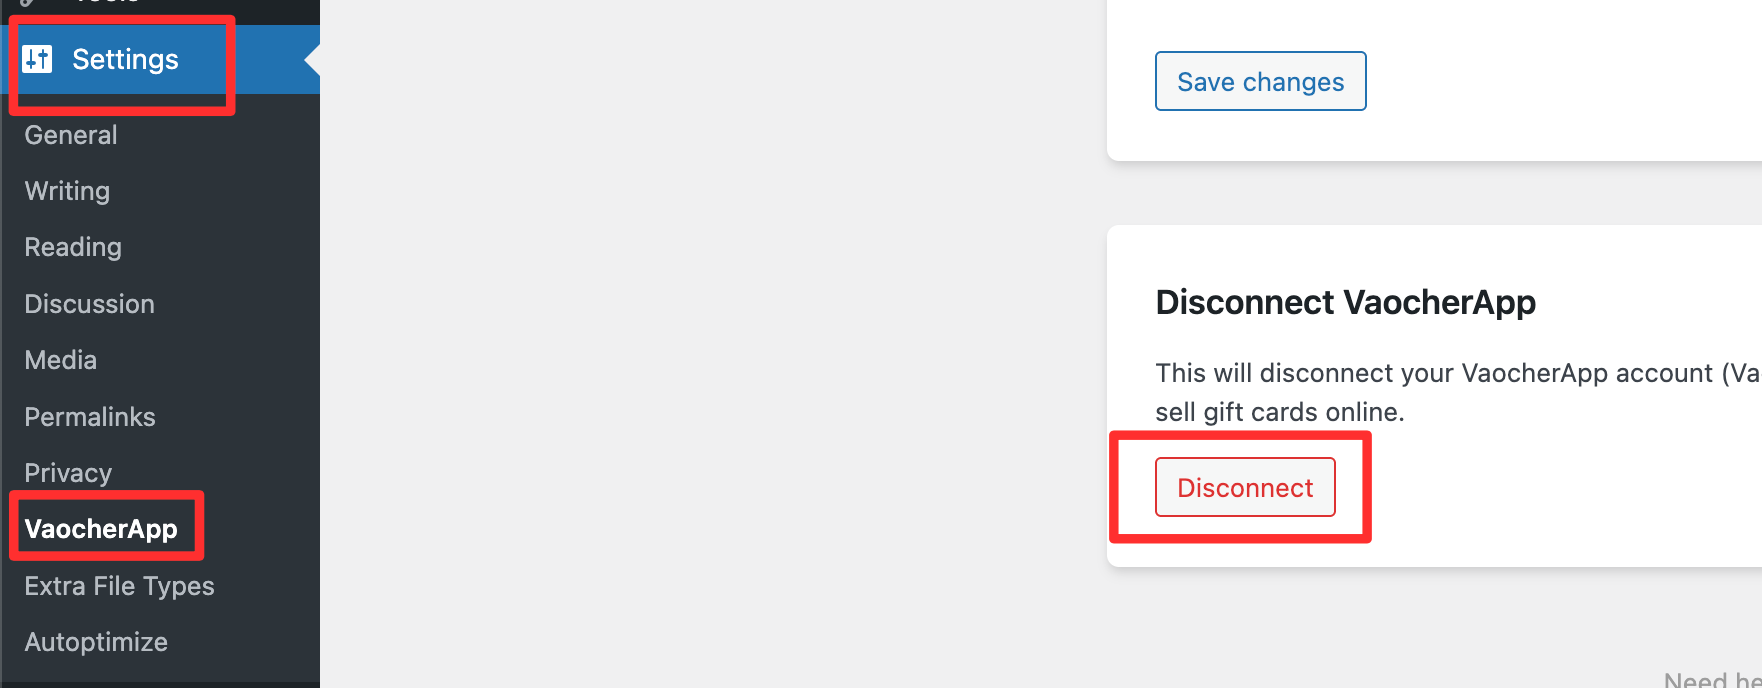
⚠️ If you are upgrading from an older version
Before connecting, make sure to:
- Disconnect and remove the old VaocherApp plugin
- Install or update to the latest version
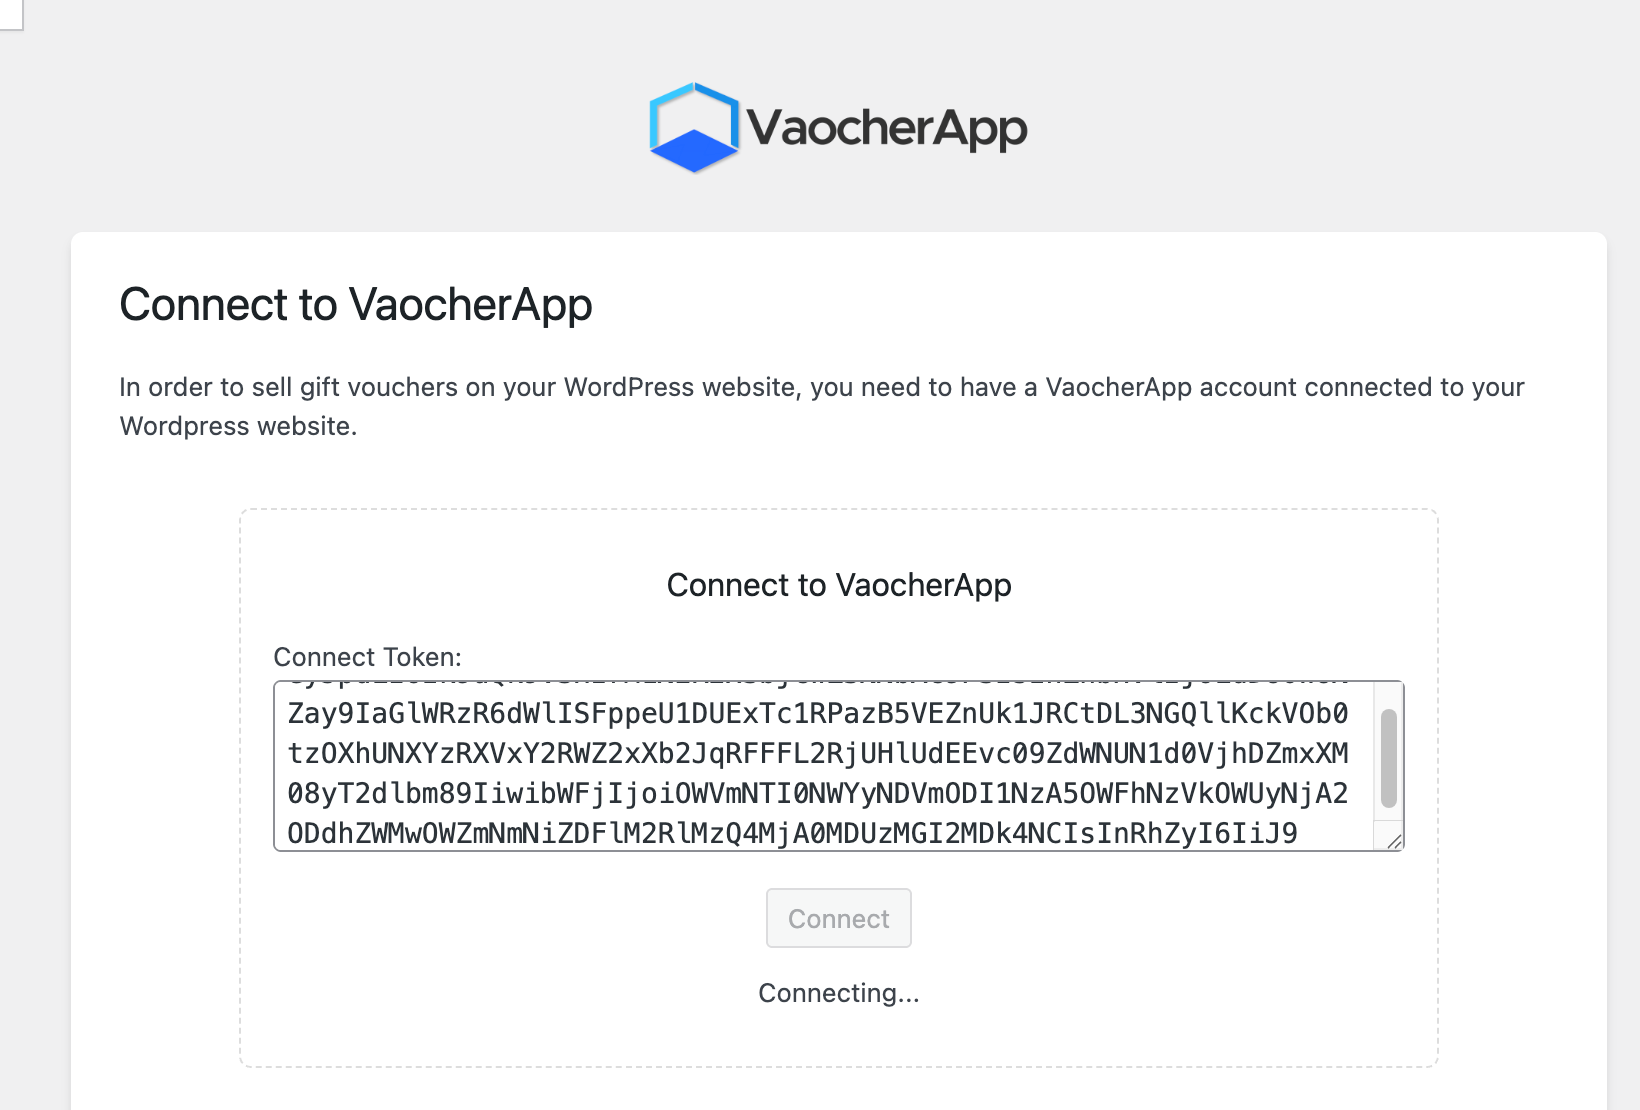
Step 1: Generate Your Connection Token
- Log in to your VaocherApp account
- Go to:
Settings → Integrations → WordPress - Click Get Started
- Copy your connection token
Step 2: Connect in WordPress
- Go back to your WordPress admin
- Open VaocherApp plugin settings
- Paste your connection token
- Click Connect
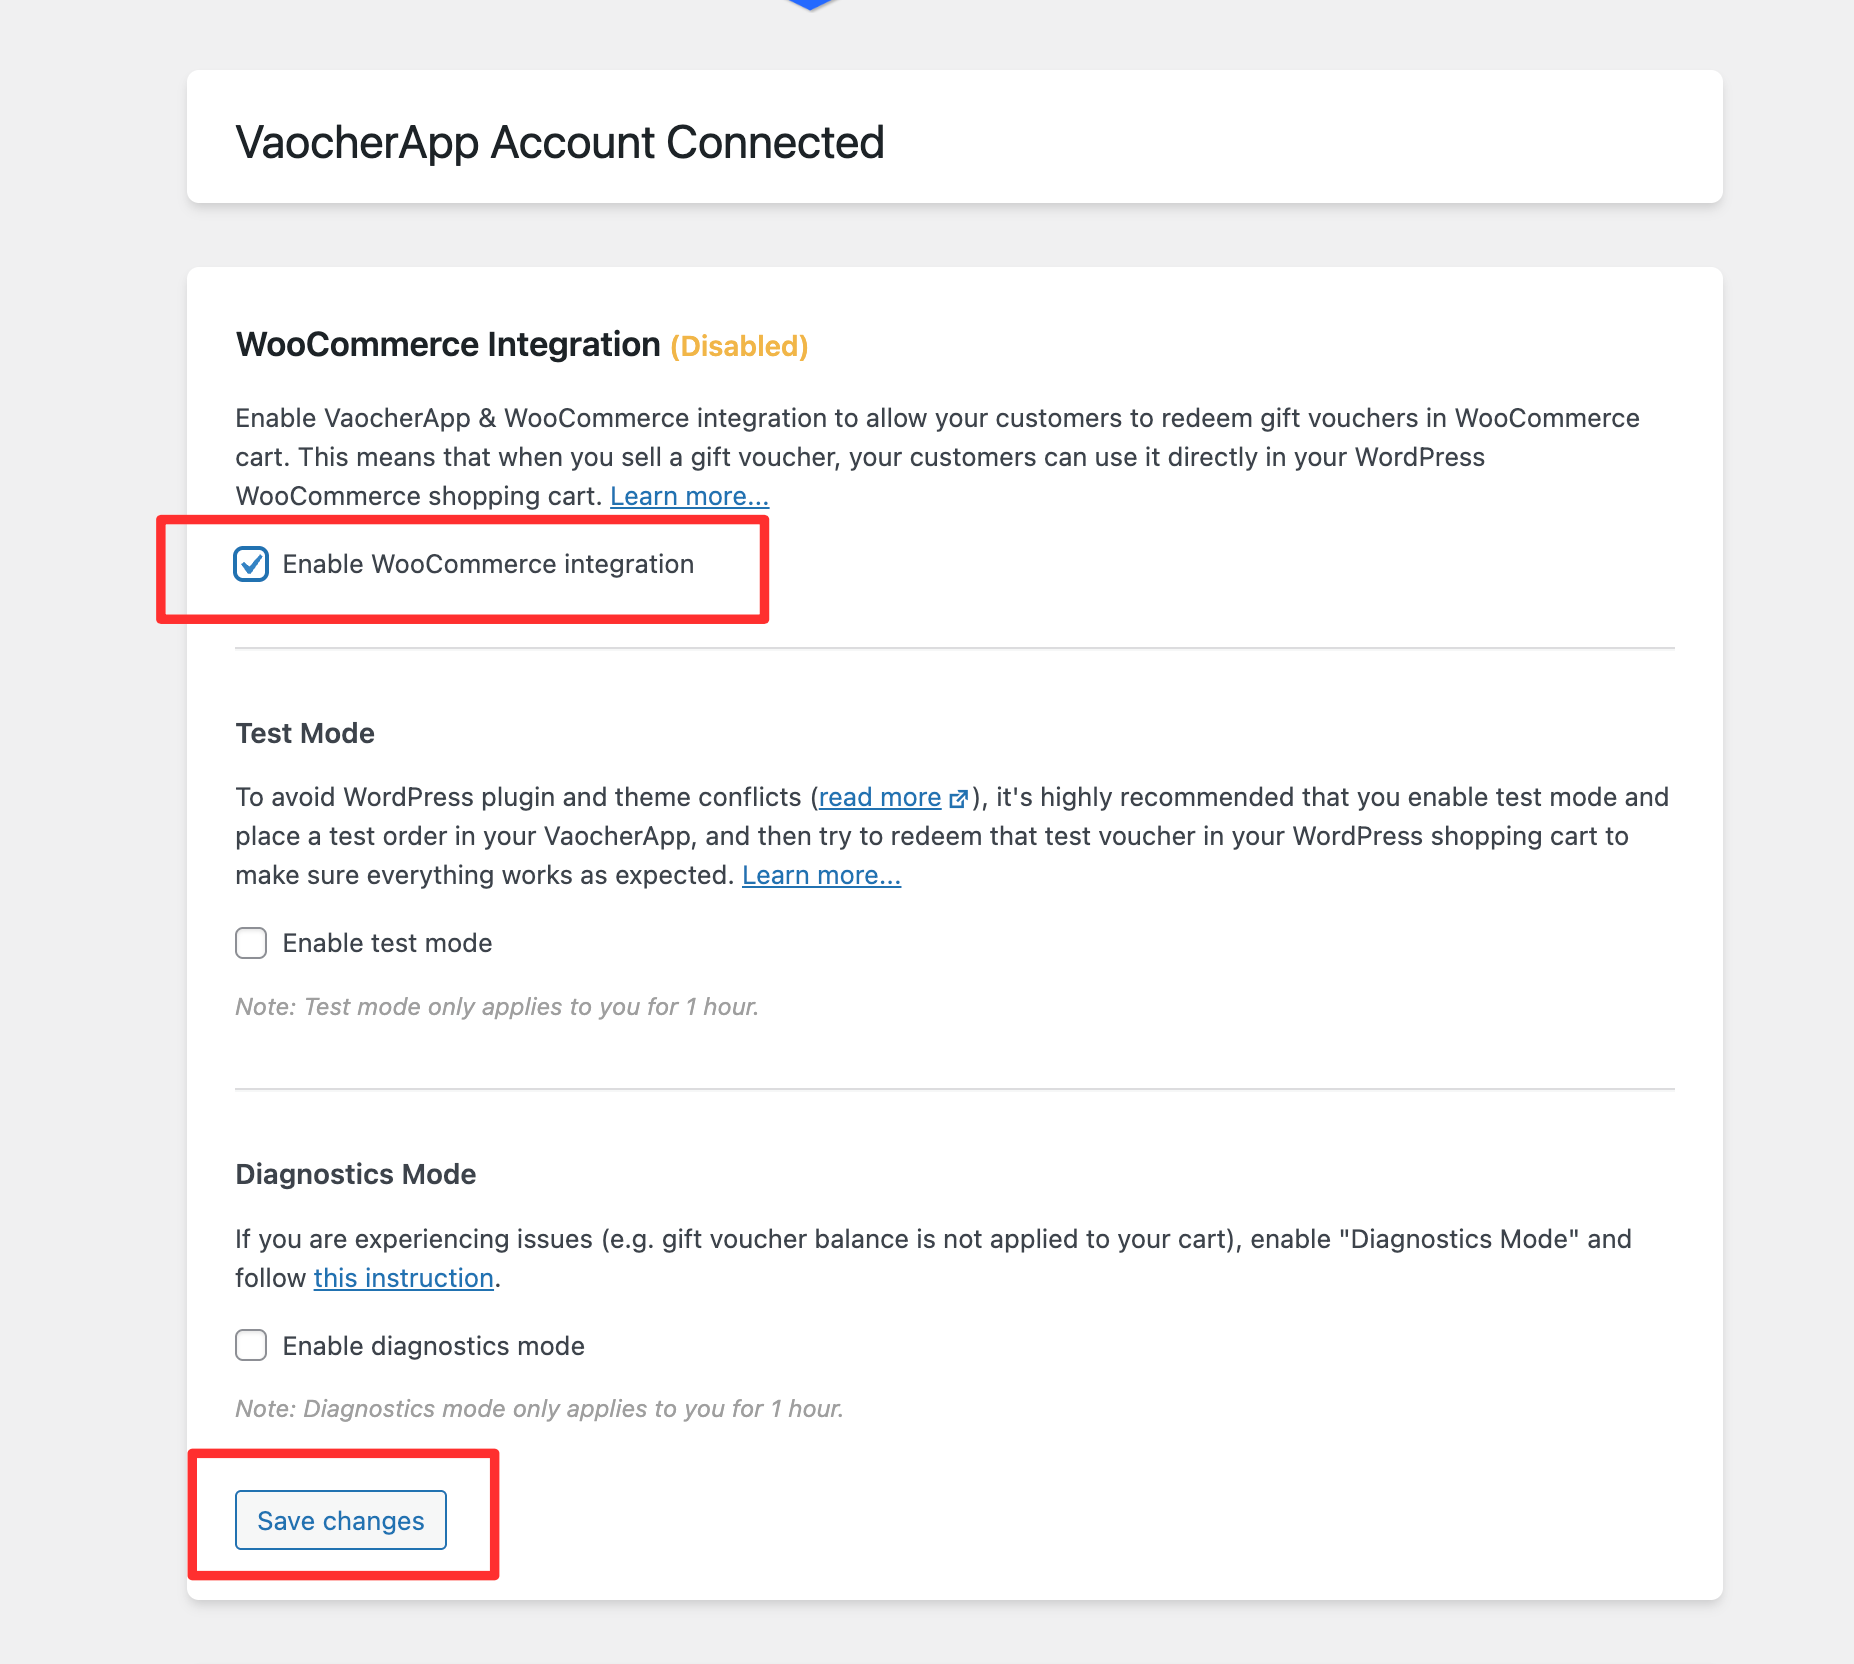
Step 3: Enable WooCommerce
After connecting:
- Enable WooCommerce
- Click Save Changes
4. Embed the Voucher Store
Add the shortcode below to your voucher page:
[vaocherapp embed-mode=“full”]
This will display your full voucher store on your website.
Multi-Site Setup (Cross-Site Redemption)
If you have multiple WordPress websites, you can connect them all to the same VaocherApp account.
- Install and connect the plugin on each site
- Use the same connection token
- Enable WooCommerce on each site
Result:
- Vouchers purchased on one website can be redeemed on another
- A unified voucher system across all your websites
Notes
- Always remove old plugin versions before reconnecting
- Ensure WooCommerce is installed before enabling it
- Copy the token exactly (avoid extra spaces)
- Test purchase and redemption after setup