


How to Sell Vouchers In-Person Using the VaocherApp Web App
Offering gift vouchers for sale in-person at your venue is an easy way to give customers a quick and convenient purchase option. While we also have a guide for selling vouchers via the VaocherApp Mobile App, this article focuses on selling vouchers using the web app, with practical examples for handling physical vouchers at your location.
Table of Contents
- How to Create & Sell Vouchers Step-by-Step in the Web App
- Selling Physical Vouchers: Pre-Printing Voucher Codes in Bulk
- Selling Physical Vouchers: Using a Stack of Blank Voucher Cards
- Related Articles
1. How to Create & Sell Vouchers Step-by-Step in the Web App
Use these detailed steps when selling vouchers in-person via the VaocherApp web app. This guide covers how to efficiently create, issue, and deliver physical vouchers during face-to-face sales.
Step 1: Log In to the VaocherApp Dashboard
- Visit VaocherApp Dashboard
- Enter your username and password to log into your VaocherApp dashboard.
Step 2: Start a New Order
- Click the Orders tab in the left sidebar.
- Select Issue New Voucher to begin.

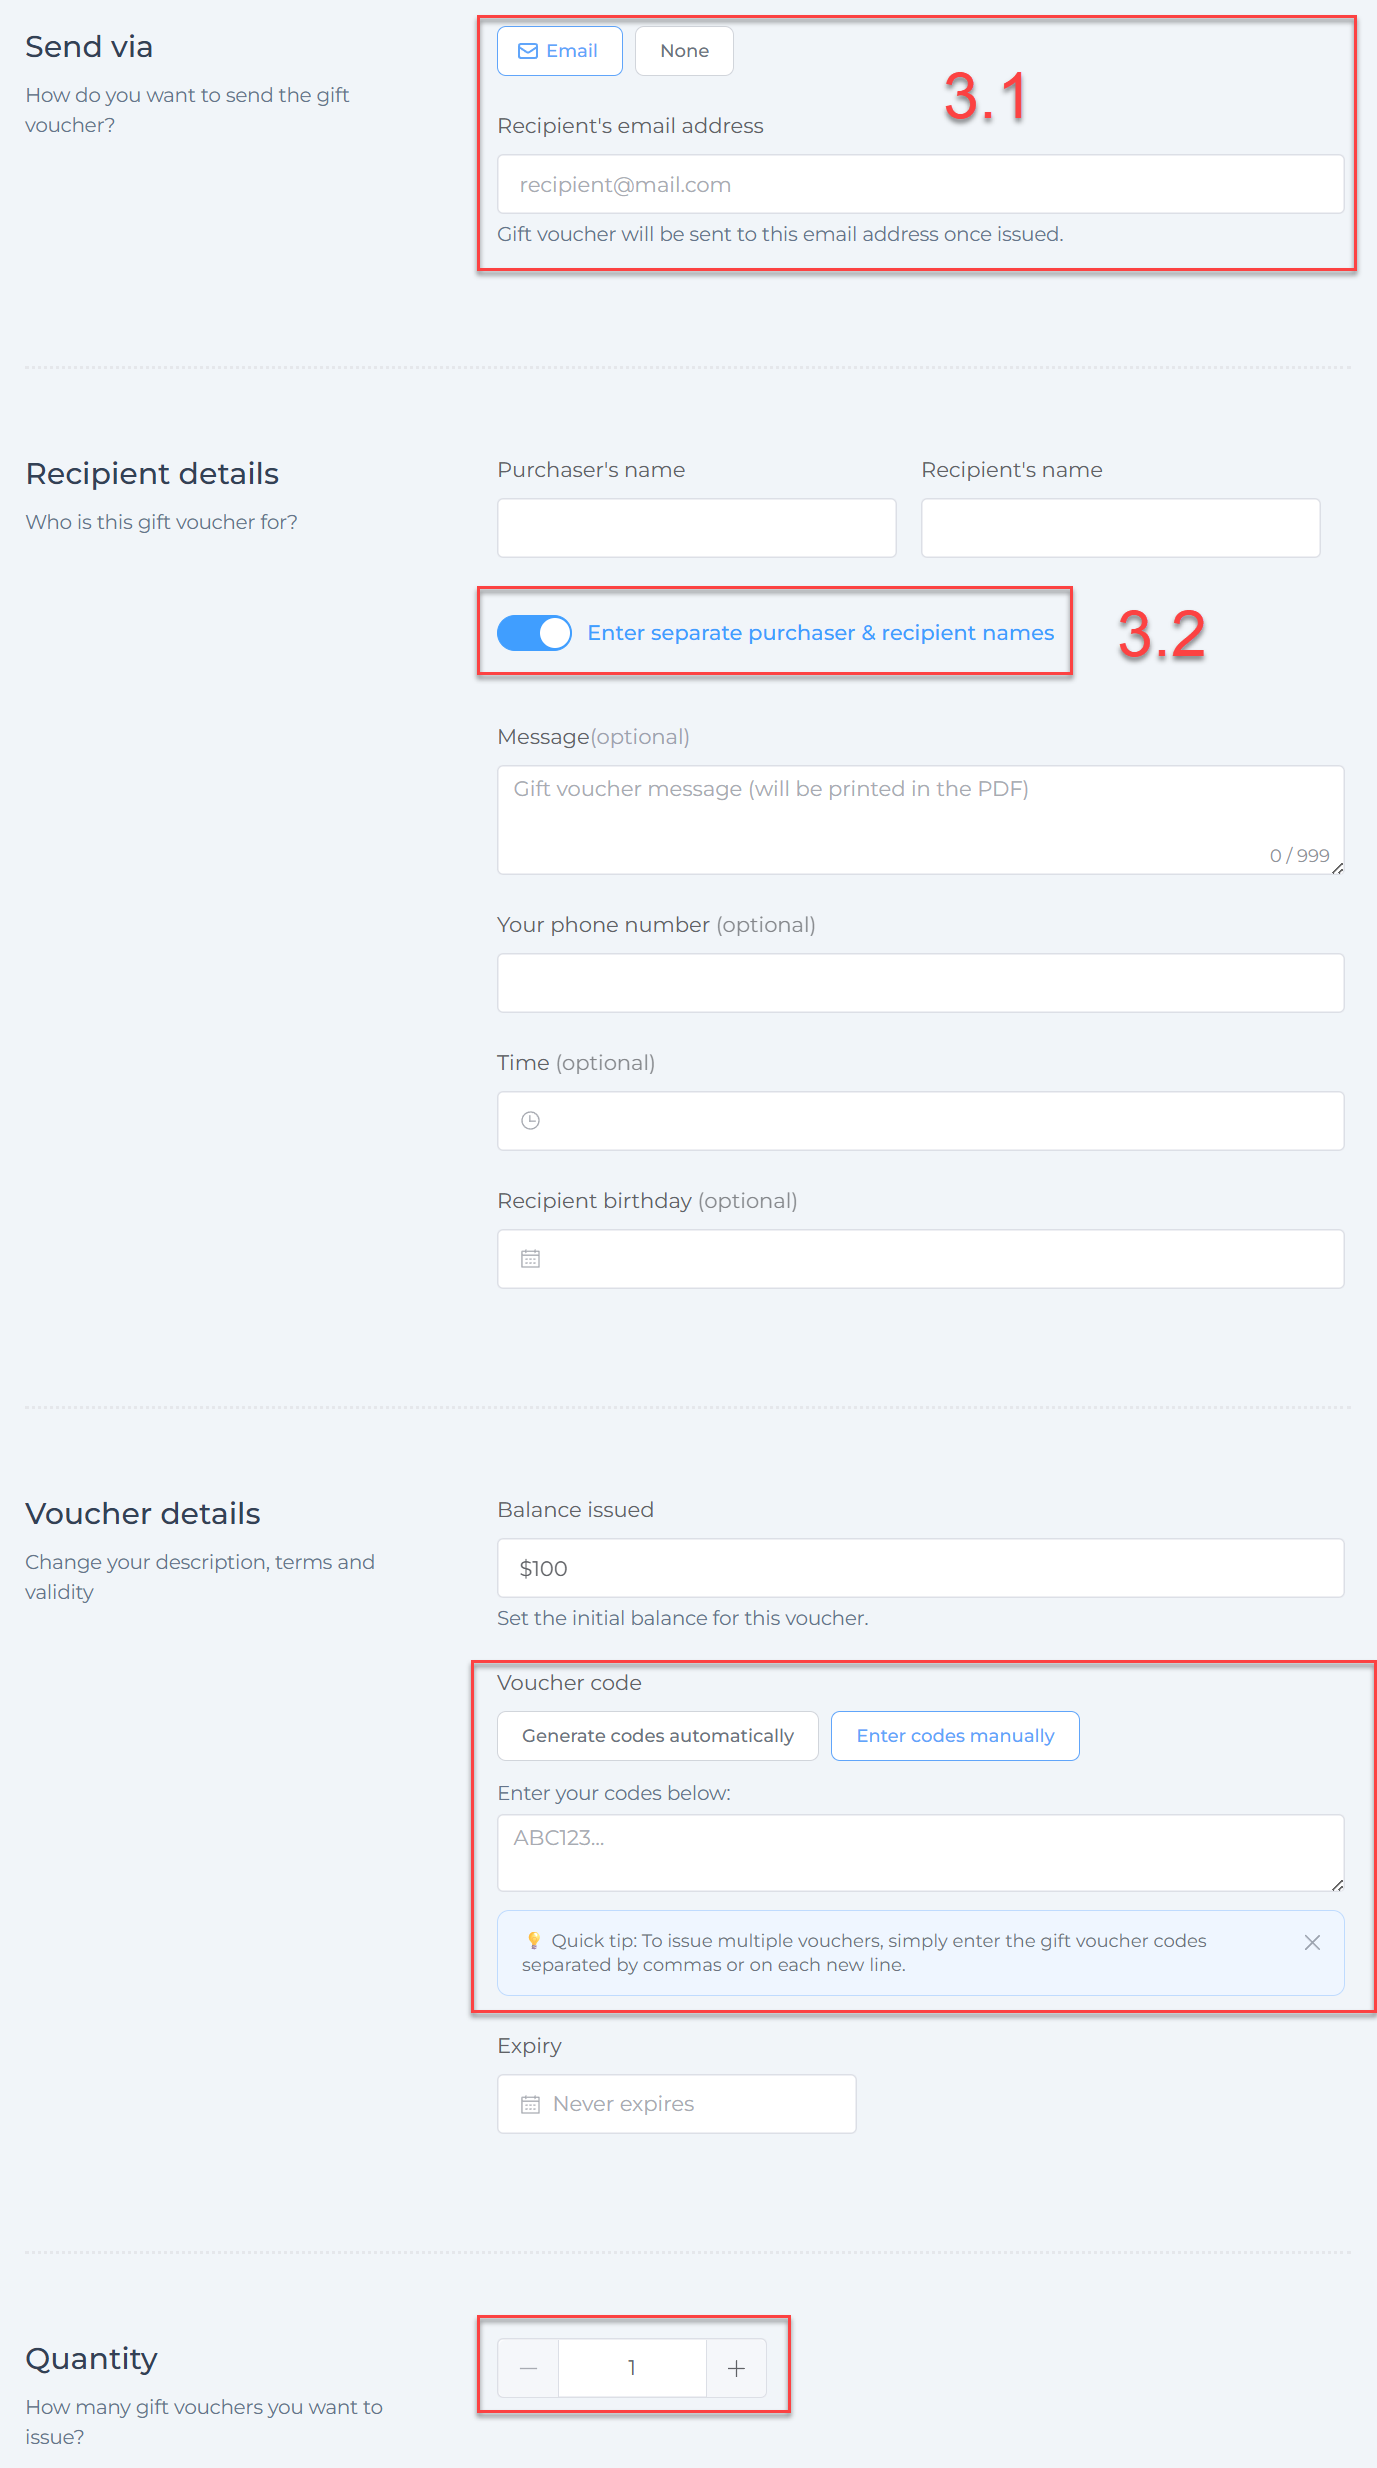
Step 3: Enter Voucher Details
Here you customize the vouchers you want to sell.
-
Send via: Choose how you want to deliver the voucher:
- Email — Enter the recipient’s email address to send the voucher automatically once issued.
- None — No email will be sent; the voucher can be printed or manually given as a physical card.
-
Enter purchaser separately (Toggle switch):
- ON — Allows entering purchaser contact details (name, email) separately from recipient info. Useful for gifting.
- OFF — Purchaser and recipient are treated as the same person.
3.1. Recipient’s email address: (Visible only if Email is selected) Enter the email address to which the voucher will be sent.
3.2. Purchaser & Recipient Names: When the toggle is on, fields appear to enter separate purchaser and recipient names.
-
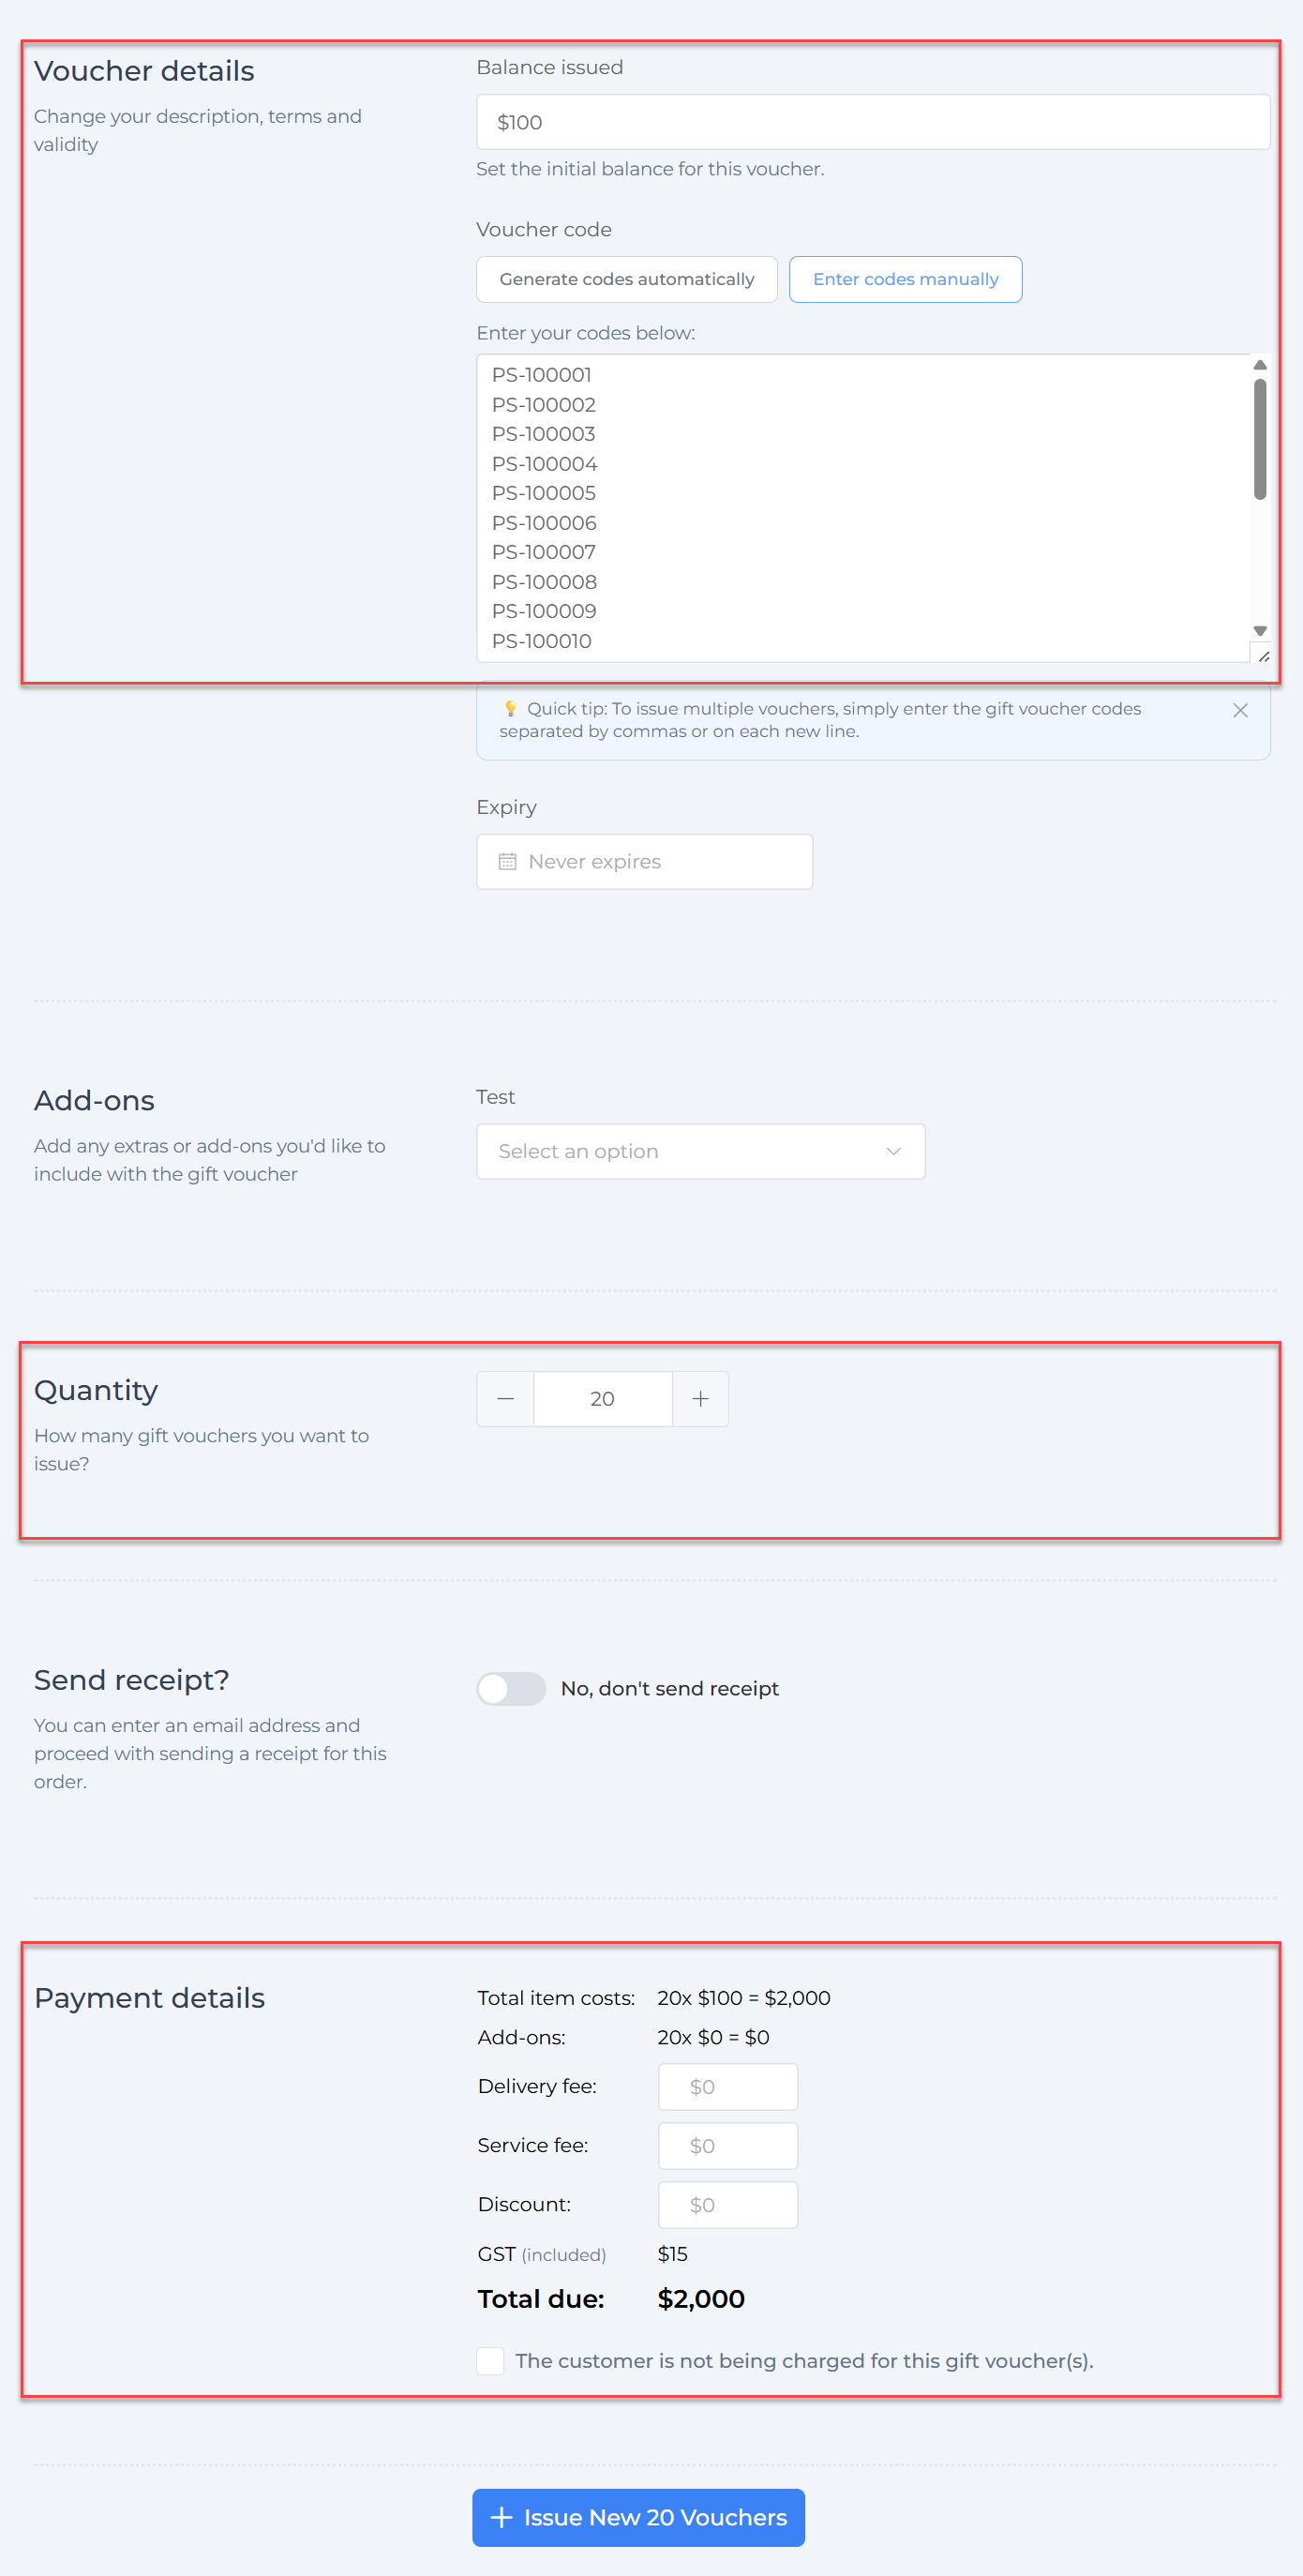
Voucher details:
- Balance issued: Enter the voucher value.
- Voucher code: Choose between:
- Generate codes automatically — The system creates unique codes automatically.
- Enter codes manually — Manually input voucher codes, one per line or separated by commas, especially useful when assigning codes to pre-printed physical cards.
-
Quantity: Use the plus/minus buttons to specify how many vouchers to issue.
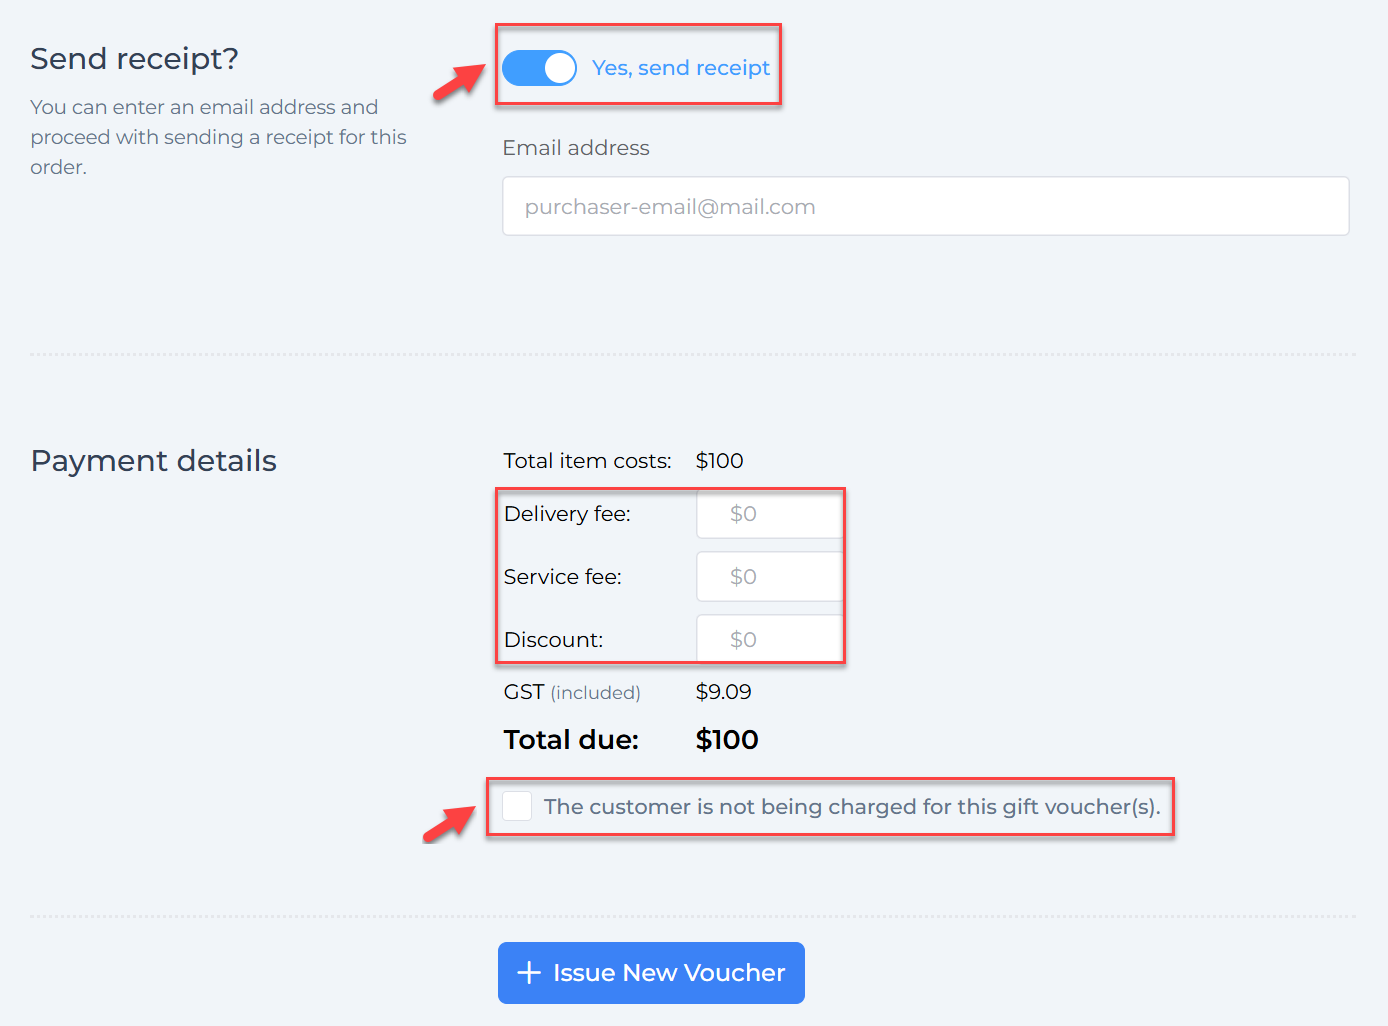
Step 4: Edit Payment Details
-
In the Payment details section below, you can:
- Add delivery fees
- Add service fees
- Apply discounts
- See GST included and total amount due
-
Checkbox: “The customer is not being charged for this gift voucher(s).”
- Tick this if the voucher is complimentary or free (e.g., for promotions or giveaways).
- Unticking this box includes the voucher sale in your financial reports.
Step 5: Issue and Deliver Vouchers
- Finalize the order by clicking Issue New Voucher.
- If a recipient email was entered, the voucher will be sent directly to that email address automatically.
- Otherwise, you can:
- Download and print the voucher(s) for handing out physically.
- Manually write the voucher codes on blank physical cards at your venue (see section below).
By following these steps, you can confidently sell physical vouchers in person via the web app, whether pre-printed in bulk or using blank cards, to suit your venue’s needs.
2. Selling Physical Vouchers: Pre-Printing Voucher Codes in Bulk
Pre-printing vouchers with unique codes is a practical way to have ready-to-sell physical gift cards available at your venue.
Steps to Pre-Print Voucher Codes:
Step 1: Create Multiple Vouchers at Once
- In the VaocherApp web app, go to Orders > Issue New Voucher.
- Select the voucher amount (e.g., $100).
- Enter the quantity (e.g., 20).
- Finalize the batch to generate all vouchers.
Step 2: Export Voucher Codes for Printing
- Go to the All Gift Vouchers Report.
- Filter the report to locate your newly created vouchers (by date or reference).
- Export as a CSV file containing voucher codes and values.
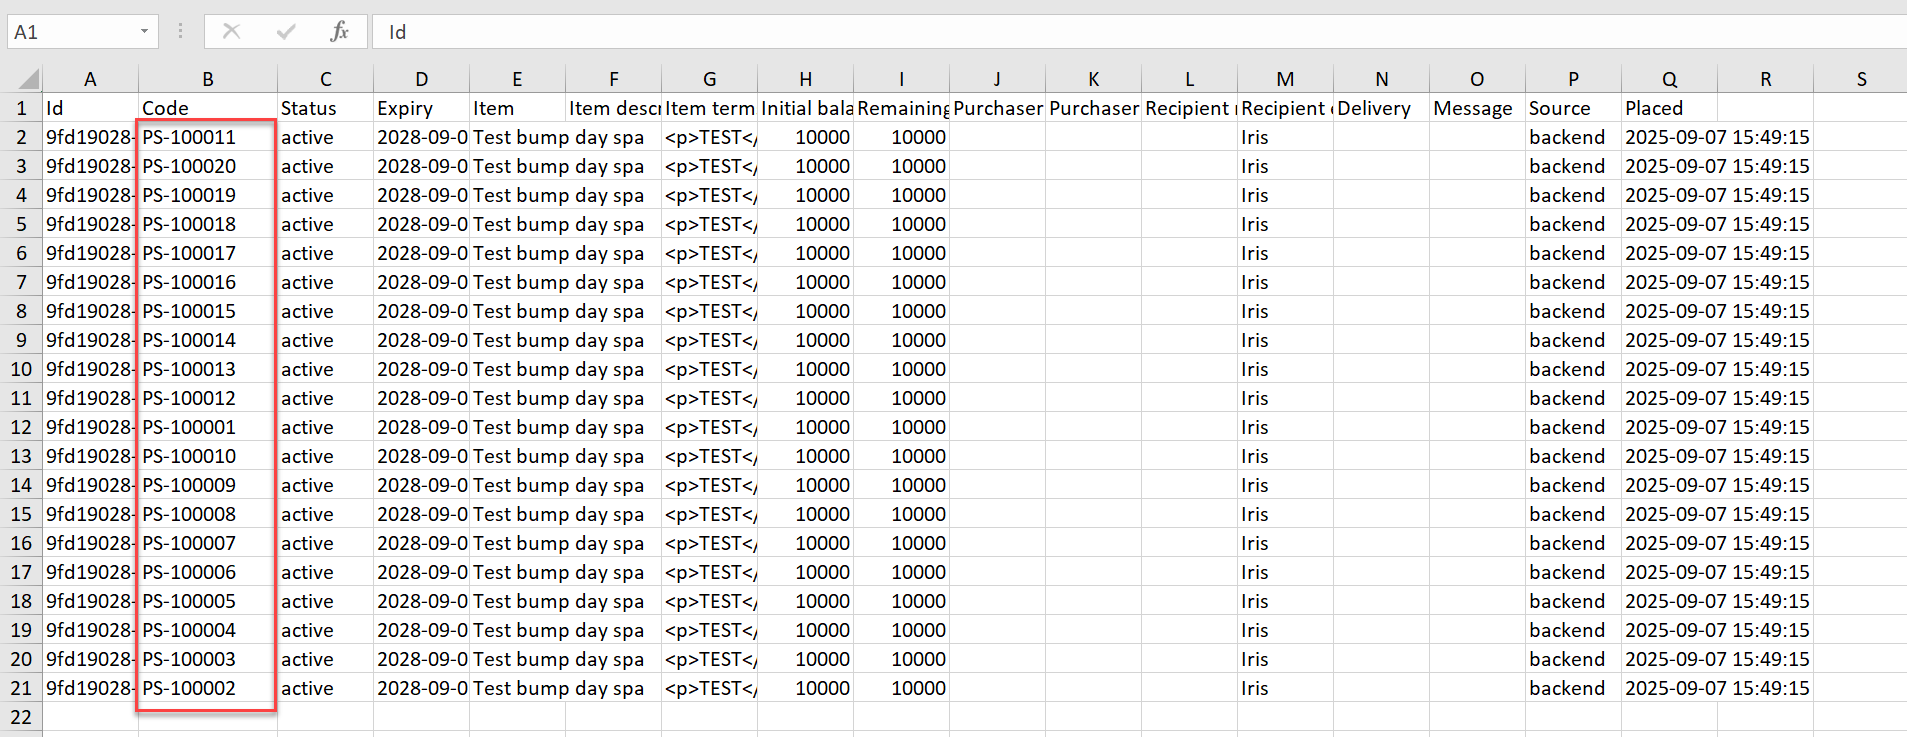
Step 3: Provide the CSV to Your Print Vendor
- Share the CSV with your printing company.
- They will print each voucher code onto individual physical cards.
- Each card is now linked to a valid voucher managed in your VaocherApp system.
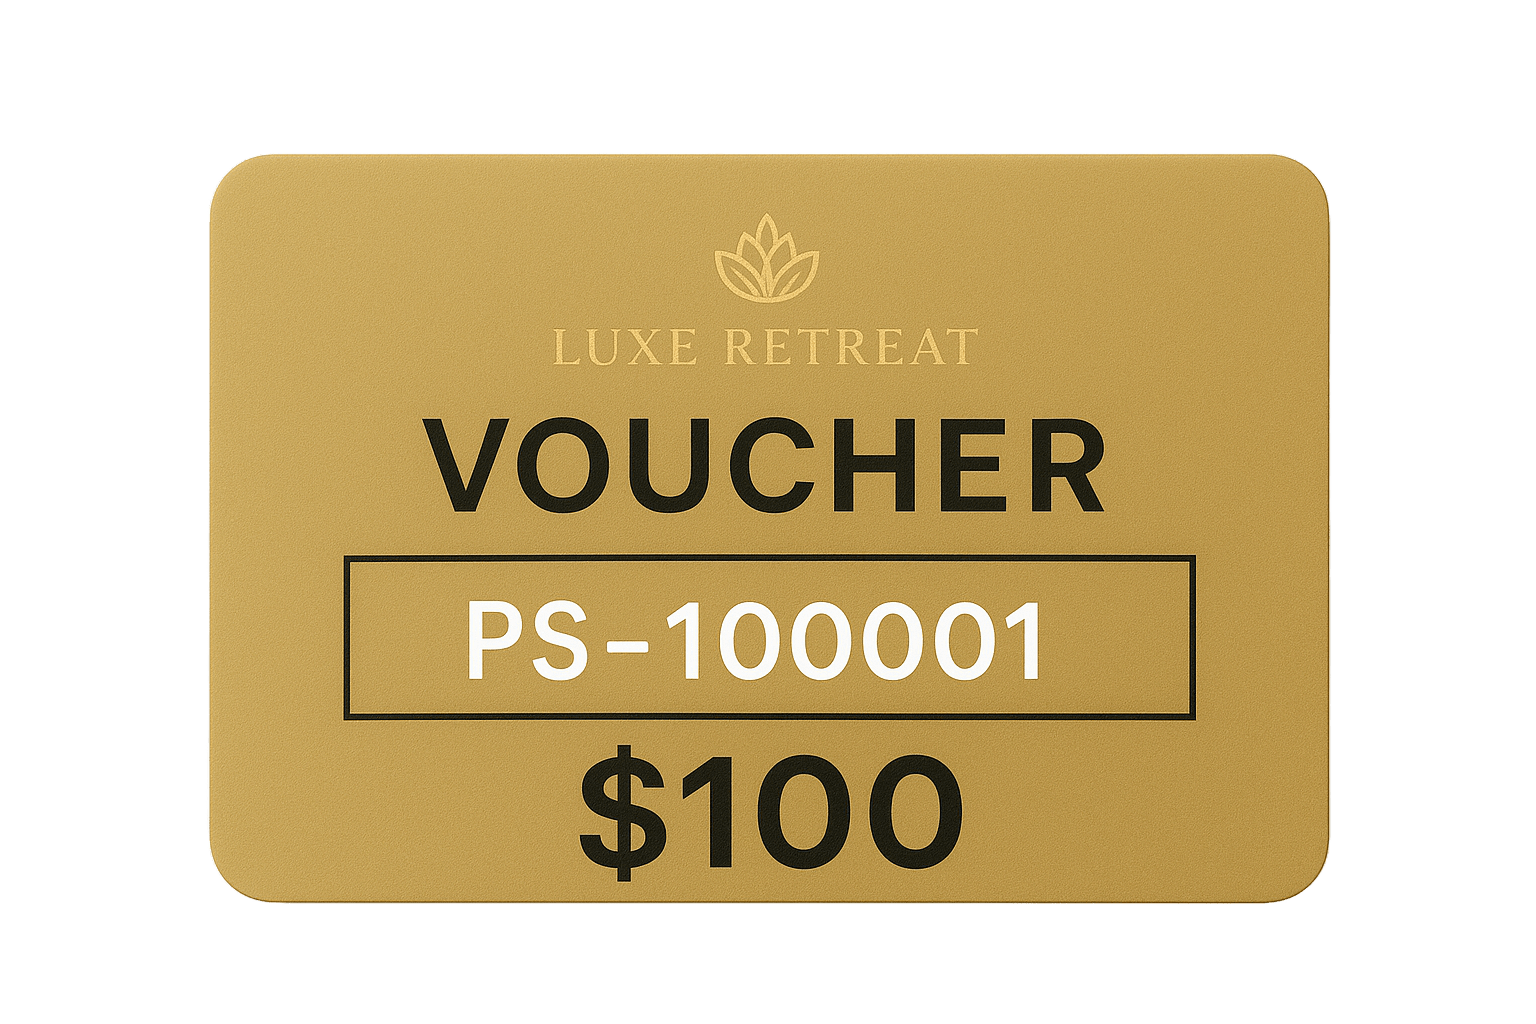
3. Selling Physical Vouchers: Using a Stack of Blank Voucher Cards
If you have blank physical voucher cards at your venue (no pre-printed codes), you can still sell vouchers easily with these steps:
Step 1: Accept Payment On-Site
- Customer pays via EFTPOS, cash, or other method at your venue.
Step 2: Create Voucher in Web App
- Staff log in to vaocher.app.
- Go to Orders > Issue New Voucher.
- Select voucher value or enter a custom amount.
- Complete the order to generate a unique voucher code.
Step 3: Write Voucher Code on Physical Card
- The voucher code will be shown immediately after order completion.
- Staff write the code clearly on a blank physical card.
- Hand the card to the customer as the valid gift voucher.
Step 4: Track Sales in VaocherApp
- The voucher is instantly active in the system.
- Use reports anytime to monitor voucher sales and redemptions.