









How to Customise Messages on Your Checkout Form
Custom messages (also called global messages) are optional text blocks you can show on your checkout form. Use them to welcome customers, share contact details, highlight a promotion, or add a thank-you after purchase.
If a message is left empty, it is not shown.
This guide covers how to edit those messages and where each one appears during checkout.
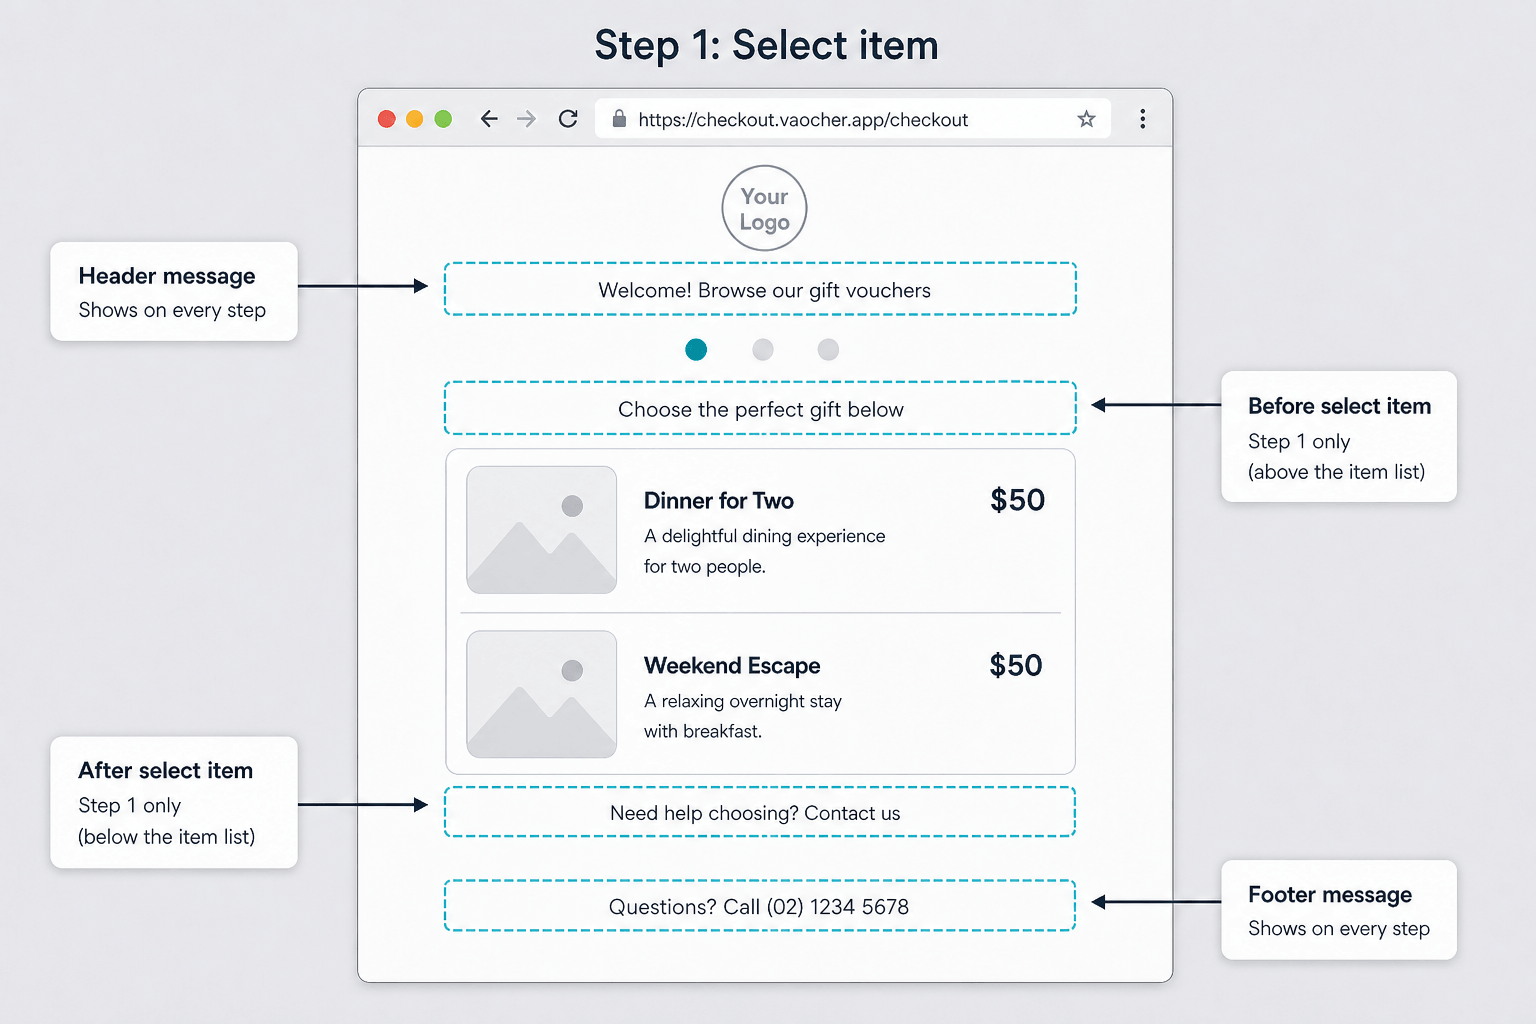
Where Each Message Appears
In settings, messages are laid out along the checkout path. Checkout itself has four steps: Select item, Enter details, Make payment, and Complete.
| Slot on the map | Where it appears | When it shows |
|---|---|---|
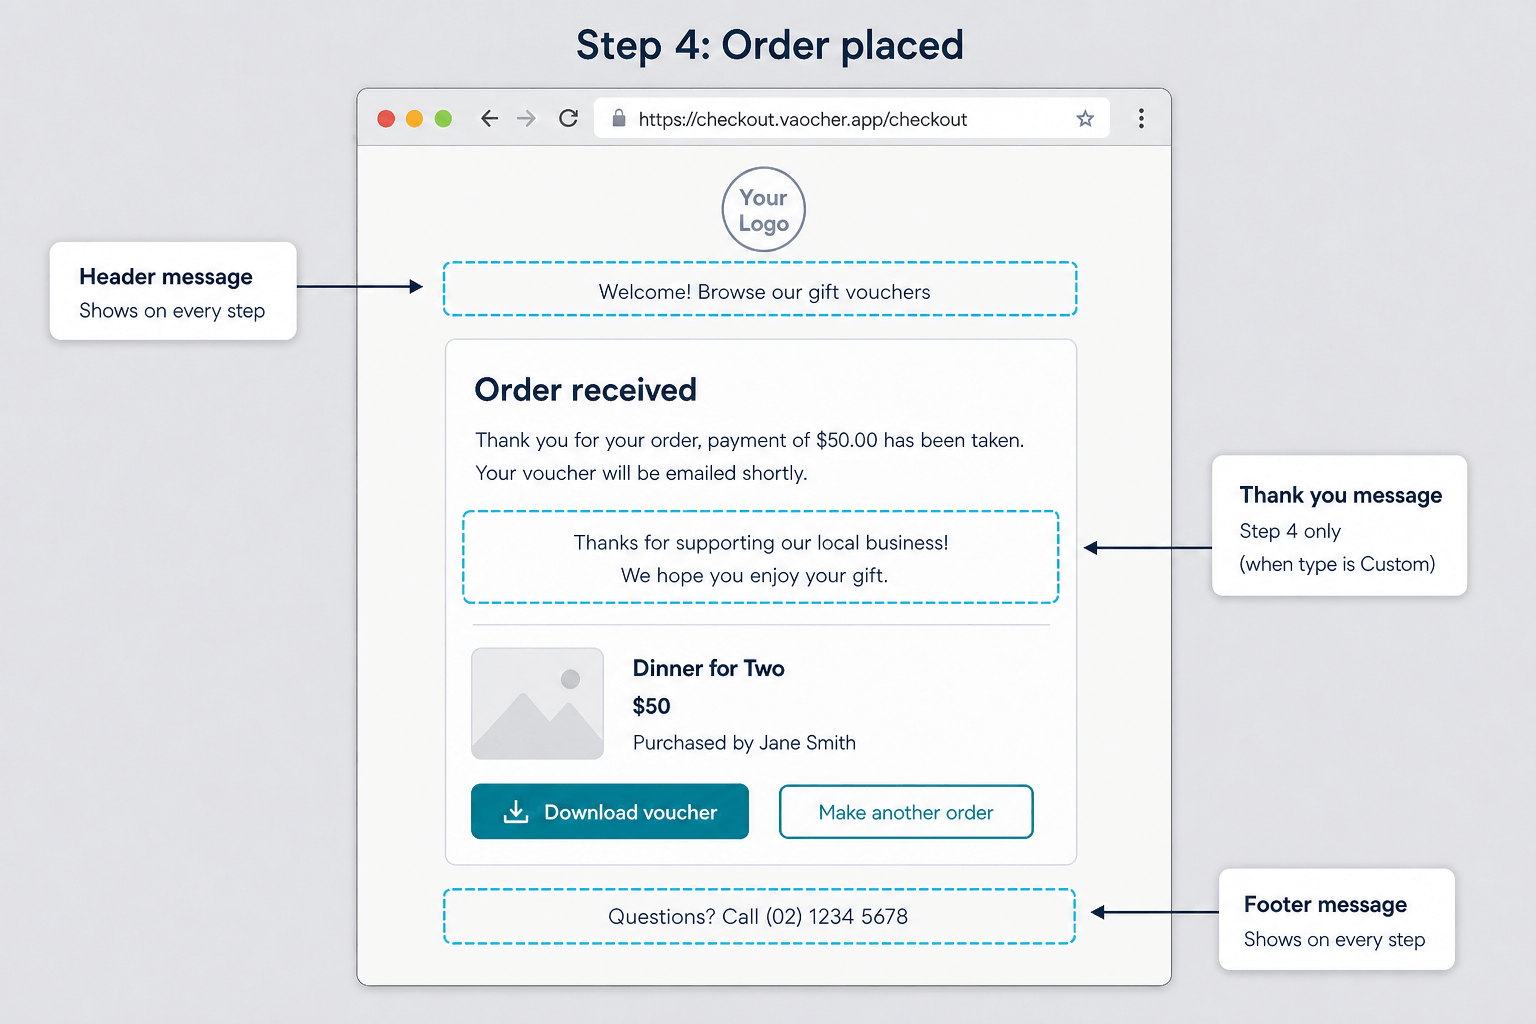
| Always on · Global header | Top of the checkout page, under your logo | Every step, including Check balance |
| 1 · Select item · Before | Above the voucher / item list | Select item only |
| 1 · Select item · After | Below the voucher / item list | Select item only |
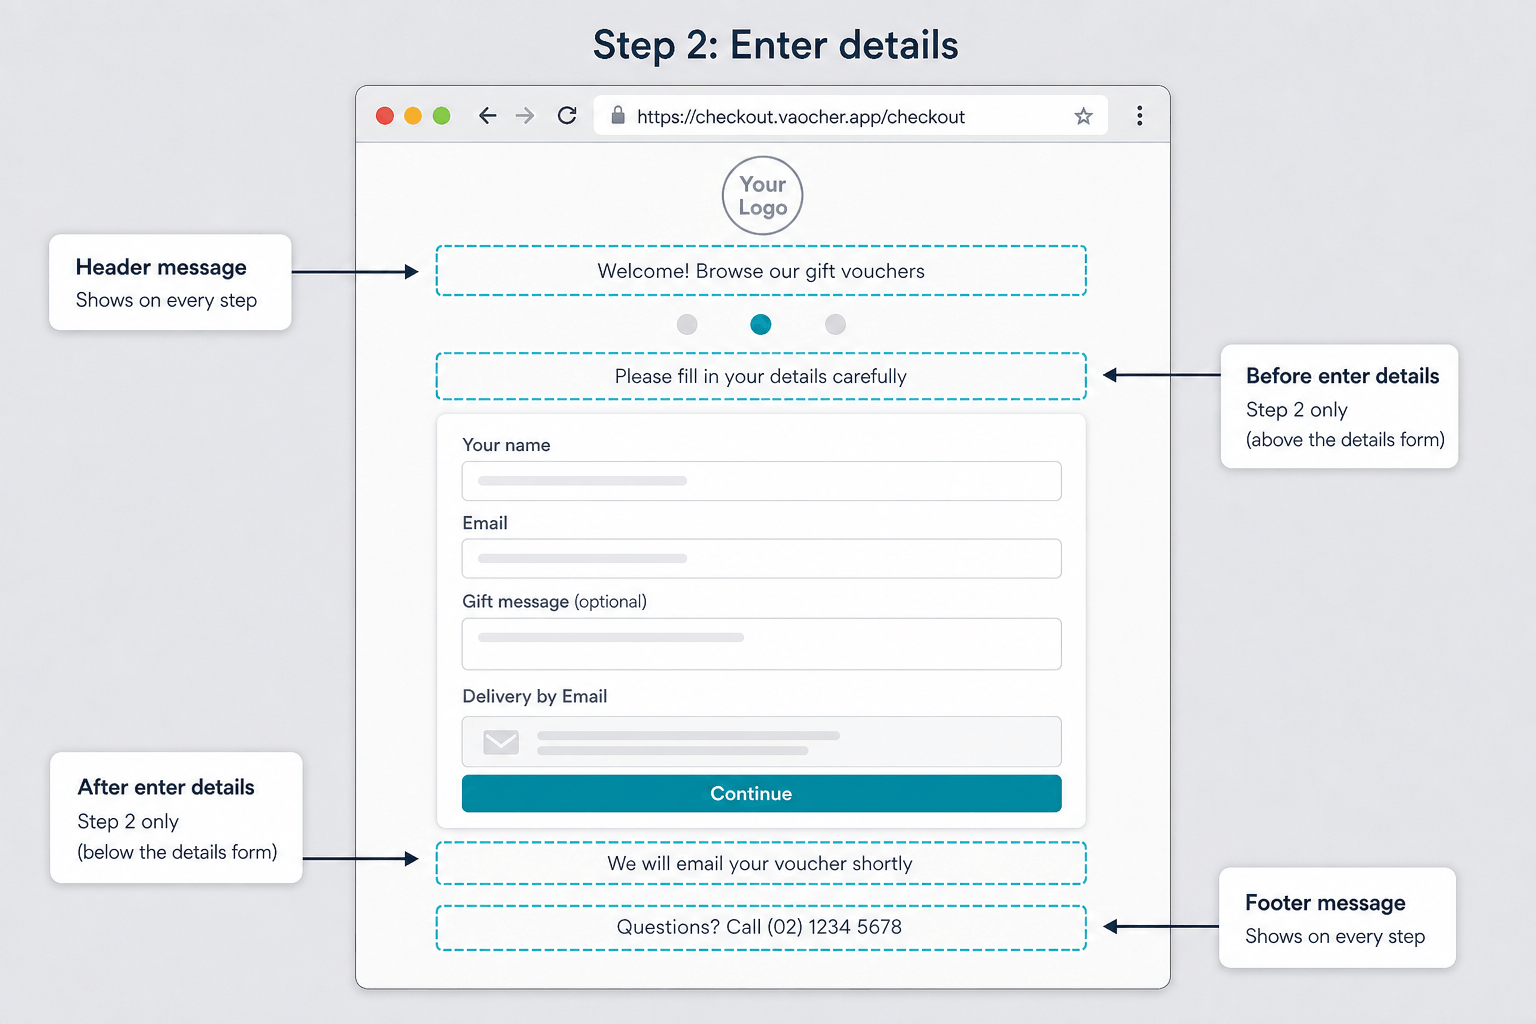
| 2 · Enter details · Before | Above the details form | Enter details only |
| 2 · Enter details · After | Below the details form | Enter details only |
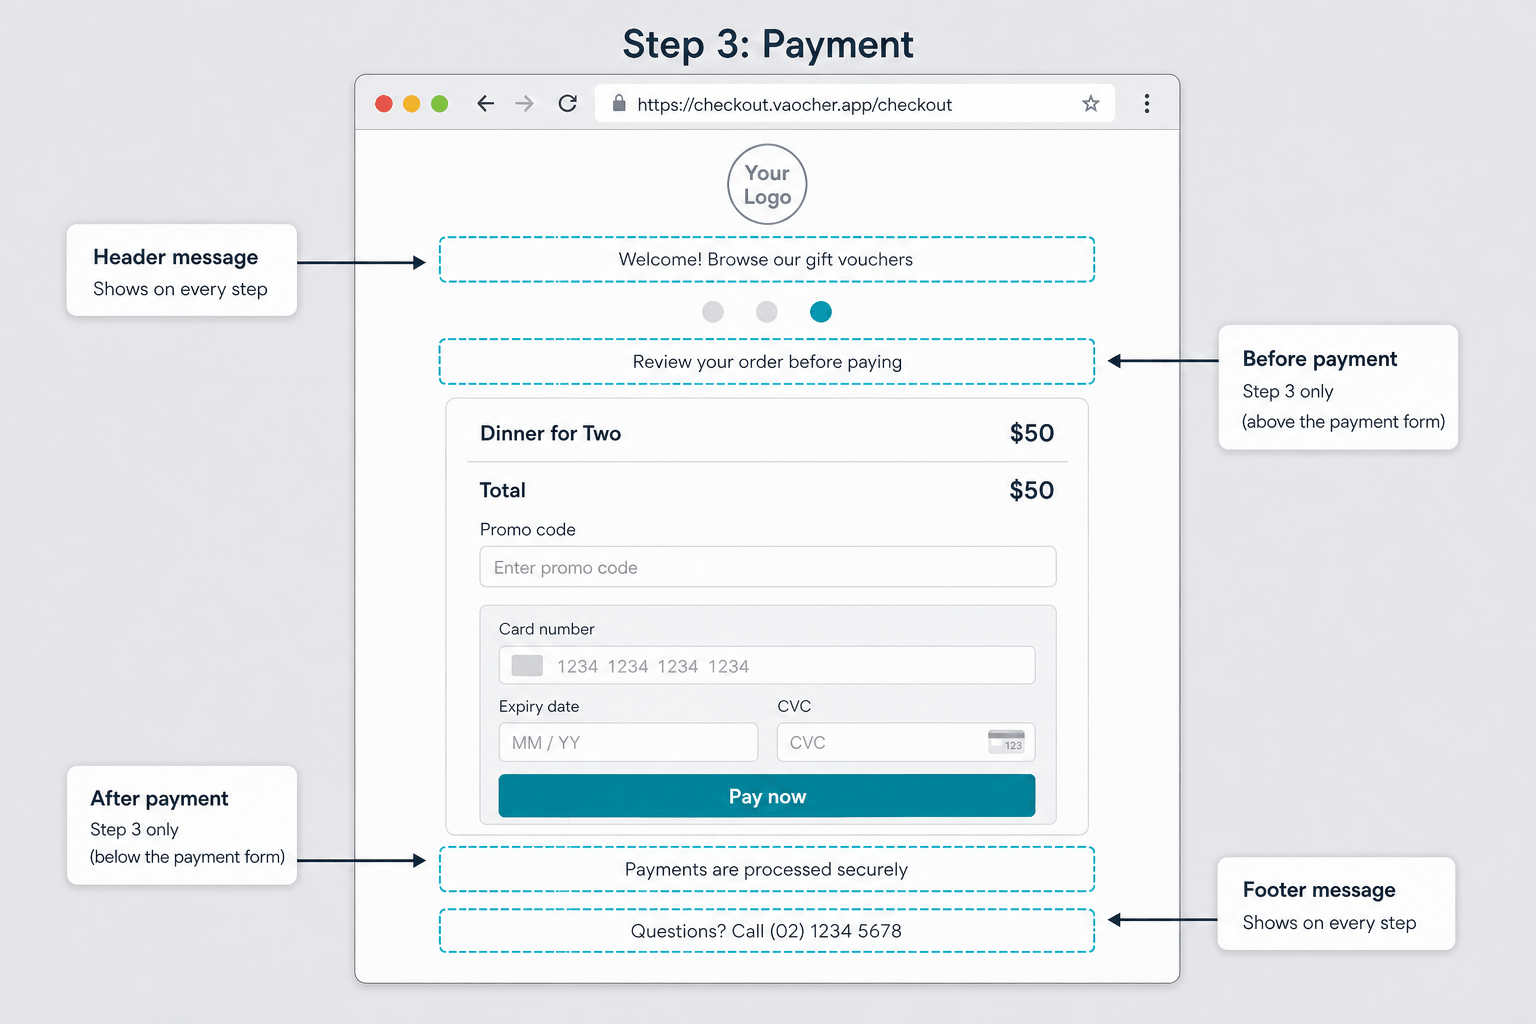
| 3 · Payment · Before | Above the payment summary and payment form | Make payment only |
| 3 · Payment · After | Below the payment form | Make payment only |
| 4 · Thank you | On the order confirmation screen, under the standard confirmation text | Complete only, and only if “Thank you” Message is set to Your own customised message |
| Always on · Global footer | Bottom of the checkout page, above the “Powered by” logo if that is shown | Every step, including Check balance |
Things to Know Before You Start
- Global header and global footer show on every checkout step, including when someone is checking a voucher balance (if that is enabled).
- Before and After messages only show on their matching step.
- Each message is edited in a text editor. You can add formatting such as headings, bold or italic text, lists, and links.
- The Thank you message is different: writing the text is not enough on its own. You also choose what happens after purchase in Settings → Checkout → General (see Show a custom thank you or redirect).
These messages are separate from:
- Item descriptions
- Item terms and conditions
- Promotion text on the payment summary
- The personal gift message a buyer can write for the recipient
Open Custom Messages
- Open the VaocherApp dashboard and go to Settings.
- Open Checkout.
- Open the Custom Messages tab.
You will see a map of the checkout path, from header at the top to footer at the bottom. Empty slots say Empty with Add. Slots that already have content show a short preview with Edit. There is no page-level Save Changes button on this tab. Each message is saved on its own.
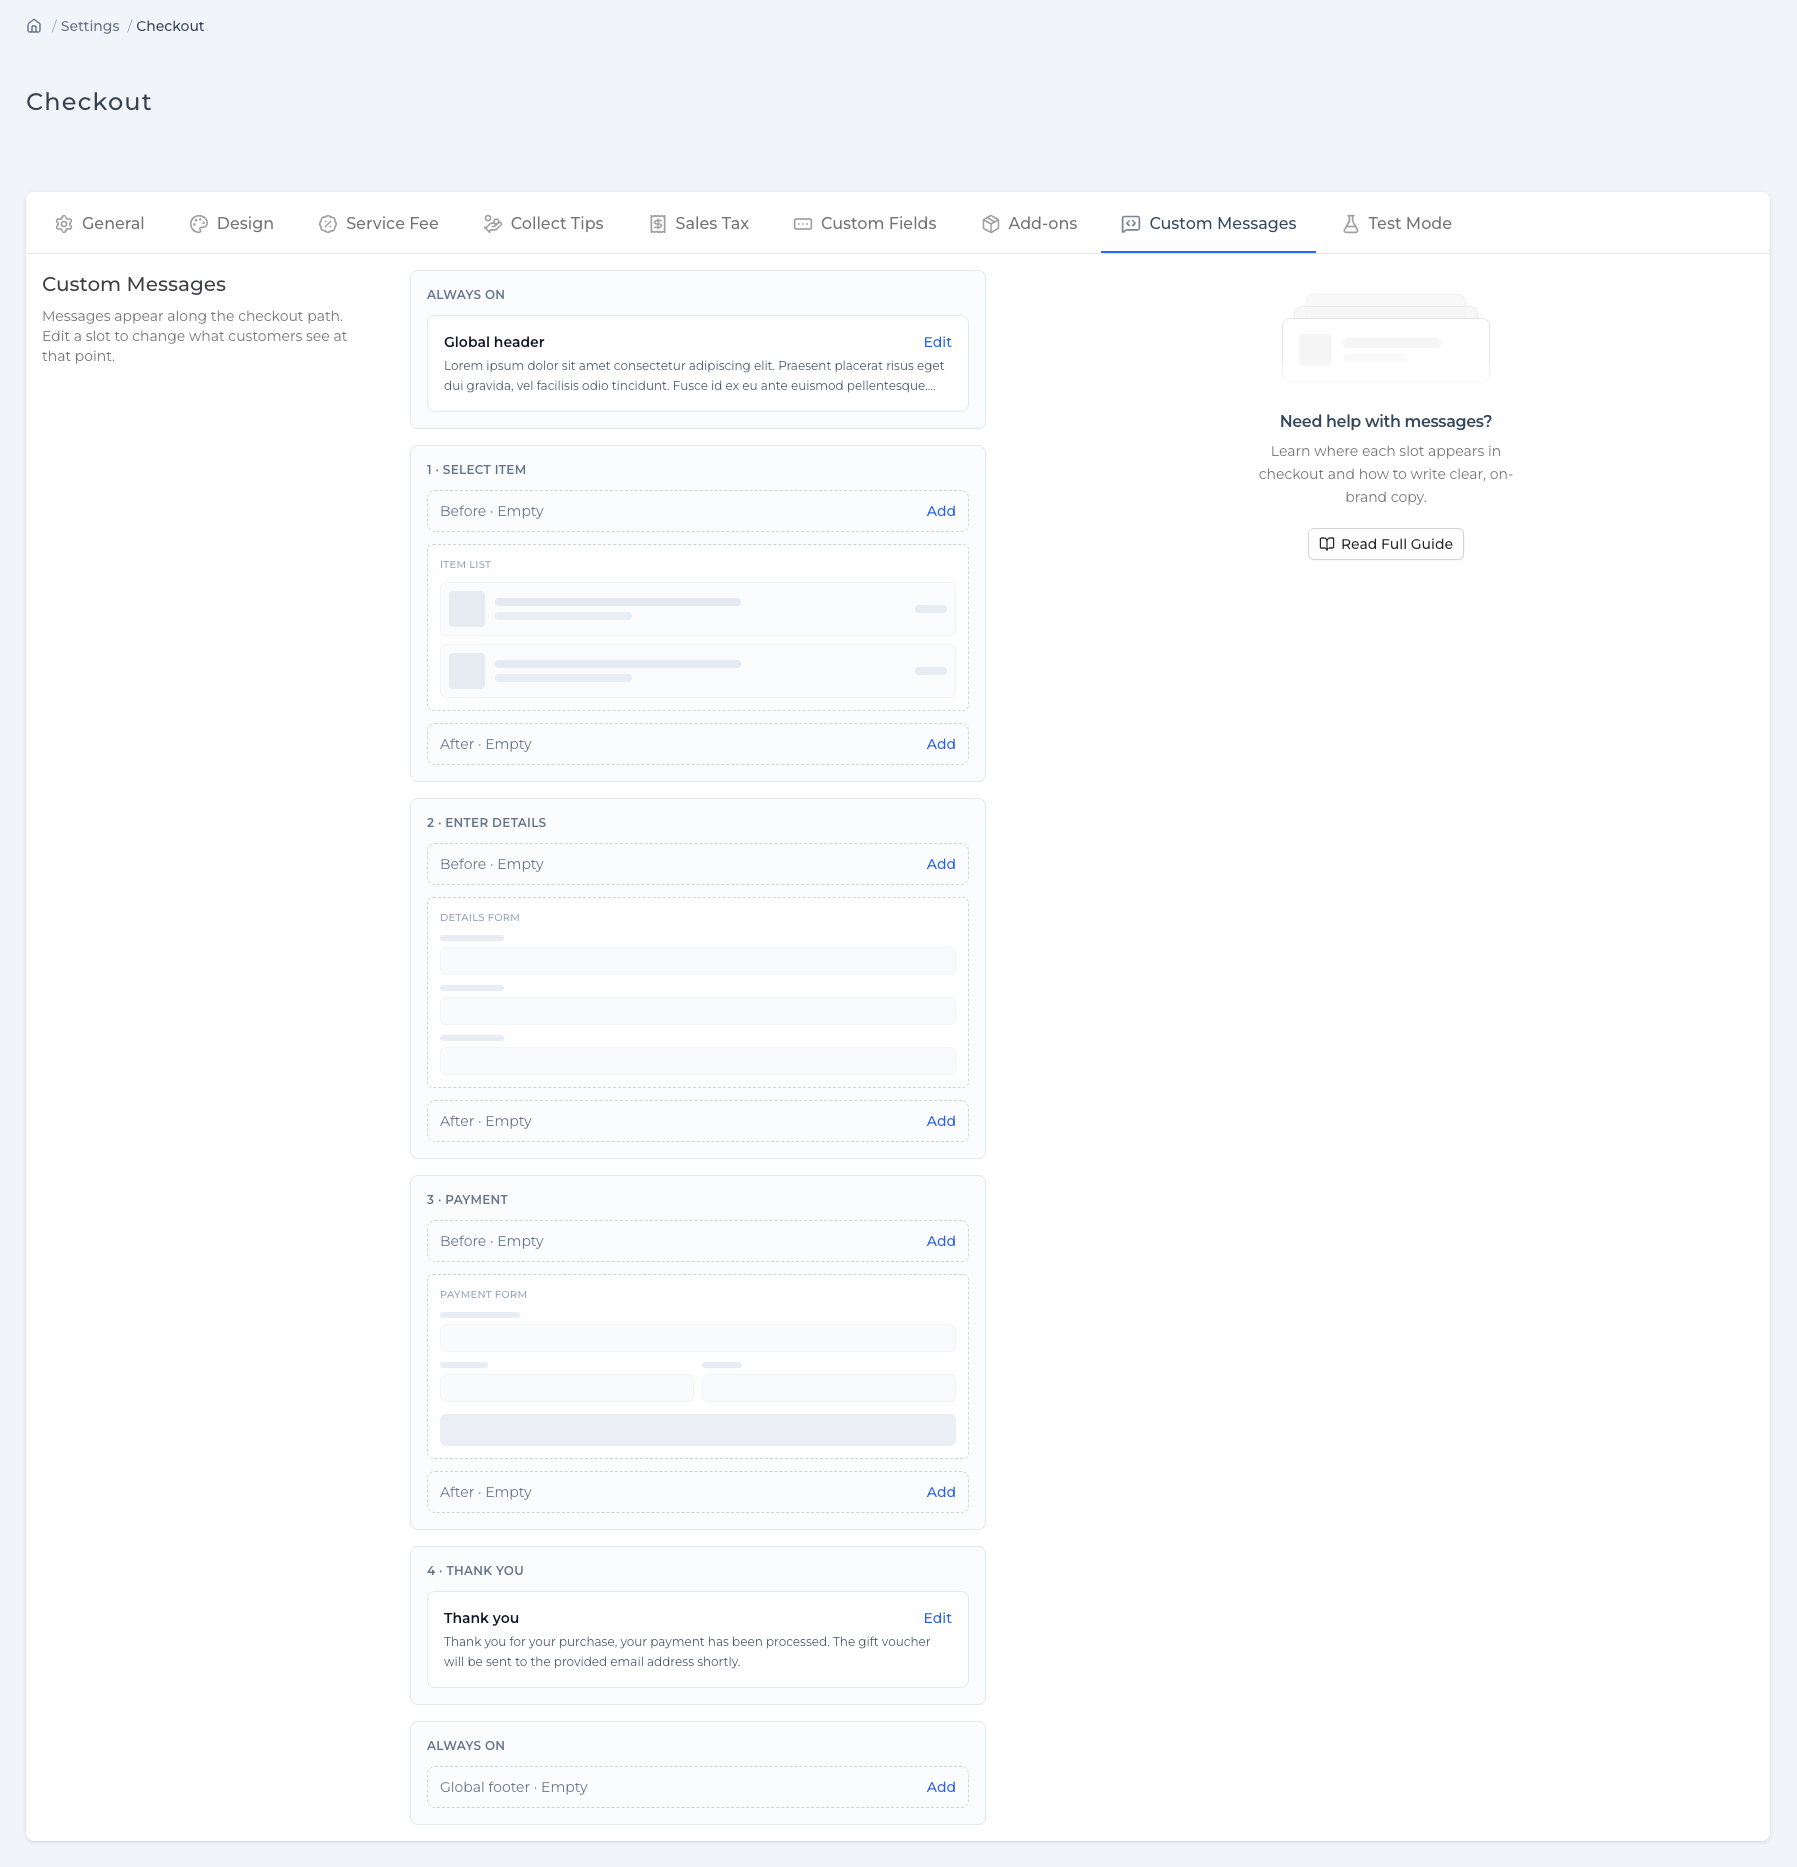
Understand the Checkout Path
The map matches the order customers see:
- Always on (top): Global header, under your logo on every page
- 1 · Select item: Before the item list, then After
- 2 · Enter details: Before the details form, then After
- 3 · Payment: Before the payment form, then After
- 4 · Thank you: Extra message on the confirmation screen, when “Thank you” Message is set to Your own customised message
- Always on (bottom): Global footer, at the bottom of every page
Grey placeholder blocks (item list, details form, payment form) are only there to show placement. They are not editable.
Placement by Checkout Step
Select item
Global header, global footer, and the Select item Before / After messages.
Enter details
Global header, global footer, and the Enter details Before / After messages.
Make payment
Global header, global footer, and the Payment Before / After messages.
Complete
Global header, global footer, and (optionally) your custom thank you message.
The standard confirmation text is separate. Customers still see Order received, plus a payment confirmation such as “Thank you for your order, payment of … has been taken.” Your Thank you message appears under that only when “Thank you” Message is set to Your own customised message.
If you choose to redirect to a page on your website, customers briefly see the confirmation screen, then are sent to your URL. The custom thank you message is not shown.
Edit and Save Your Messages
- On the Custom Messages tab, find the slot on the path.
- Click Add if it is empty, or Edit if it already has content.
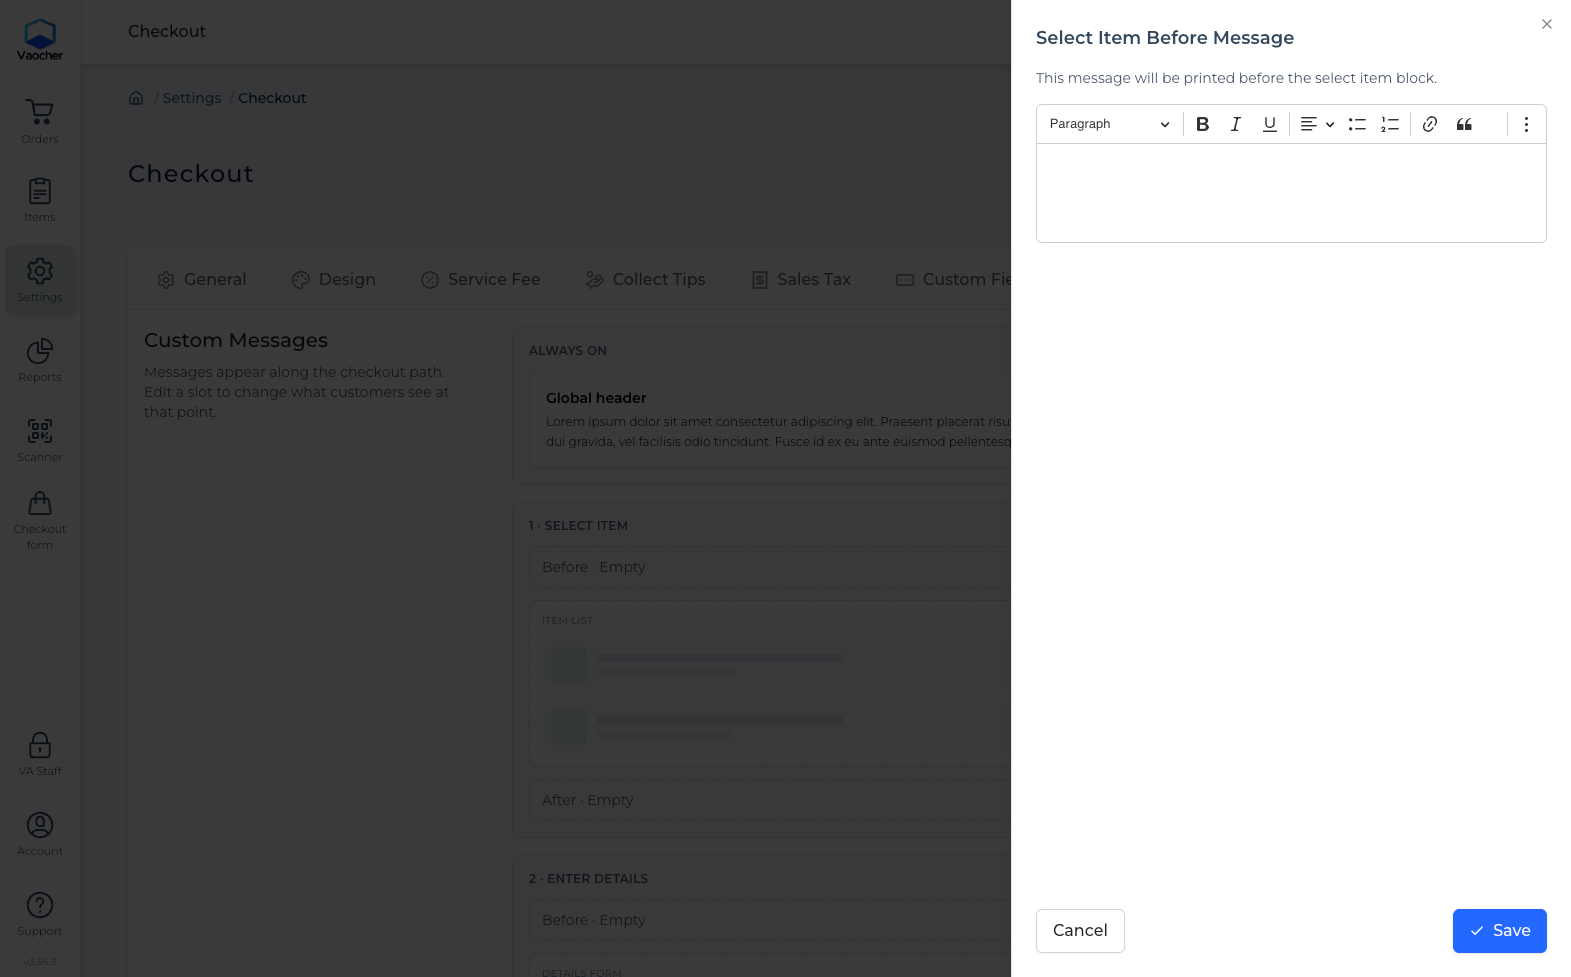
- A drawer opens with a text editor. Add your content. Useful ideas include:
- A short welcome
- Redemption tips or what happens next
- Contact details or opening hours
- A current promotion
- A thank-you after purchase
- Click Save in the drawer.
- Repeat for any other slots you want to update.
Each message is saved as soon as you click Save in its drawer. After you save, the map updates: empty slots stay quiet, and set slots show a preview of your text.
Writing Tips
- Keep messages short. Checkout is a purchase flow.
- Put always-visible information in the global header or global footer.
- Put step-specific help in the Before / After slots for that step.
- Leave unused slots empty so the page stays clean.
Show a Custom Thank You or Redirect
The 4 · Thank you slot on the Custom Messages map only stores the extra message text. To choose what customers see after purchase, open the VaocherApp dashboard and go to Settings → Checkout → General, then find “Thank you” Message.
When placing an order, customers should see:
- The standard VaocherApp message: the usual confirmation screen only (your Thank you text is not shown)
- Your own customised message: the usual confirmation screen, plus the Thank you text
- A page on your website (we’ll redirect them there): customers are sent to your URL after a short pause; the Thank you text is not shown
You can write the Thank you text in either place:
- Custom Messages → 4 · Thank you, or
- General → “Thank you” Message → Your own customised message
Both edit the same message. To show it on checkout, Your own customised message must be selected in General, then click Save Changes on that tab.
Check Your Live Checkout
Open your checkout page and walk through each step to confirm:
- Global header and global footer appear where you expect, including on Check balance if that is enabled
- Select item, Enter details, and Make payment messages appear only on those steps
- The Thank you message appears on Complete if “Thank you” Message is set to Your own customised message
- Redirect works as expected if you chose a page on your website