When you invite or edit a teammate, you decide what they can see and change in your dashboard. Most venues use a preset role. Use custom permissions when someone needs a unique mix.
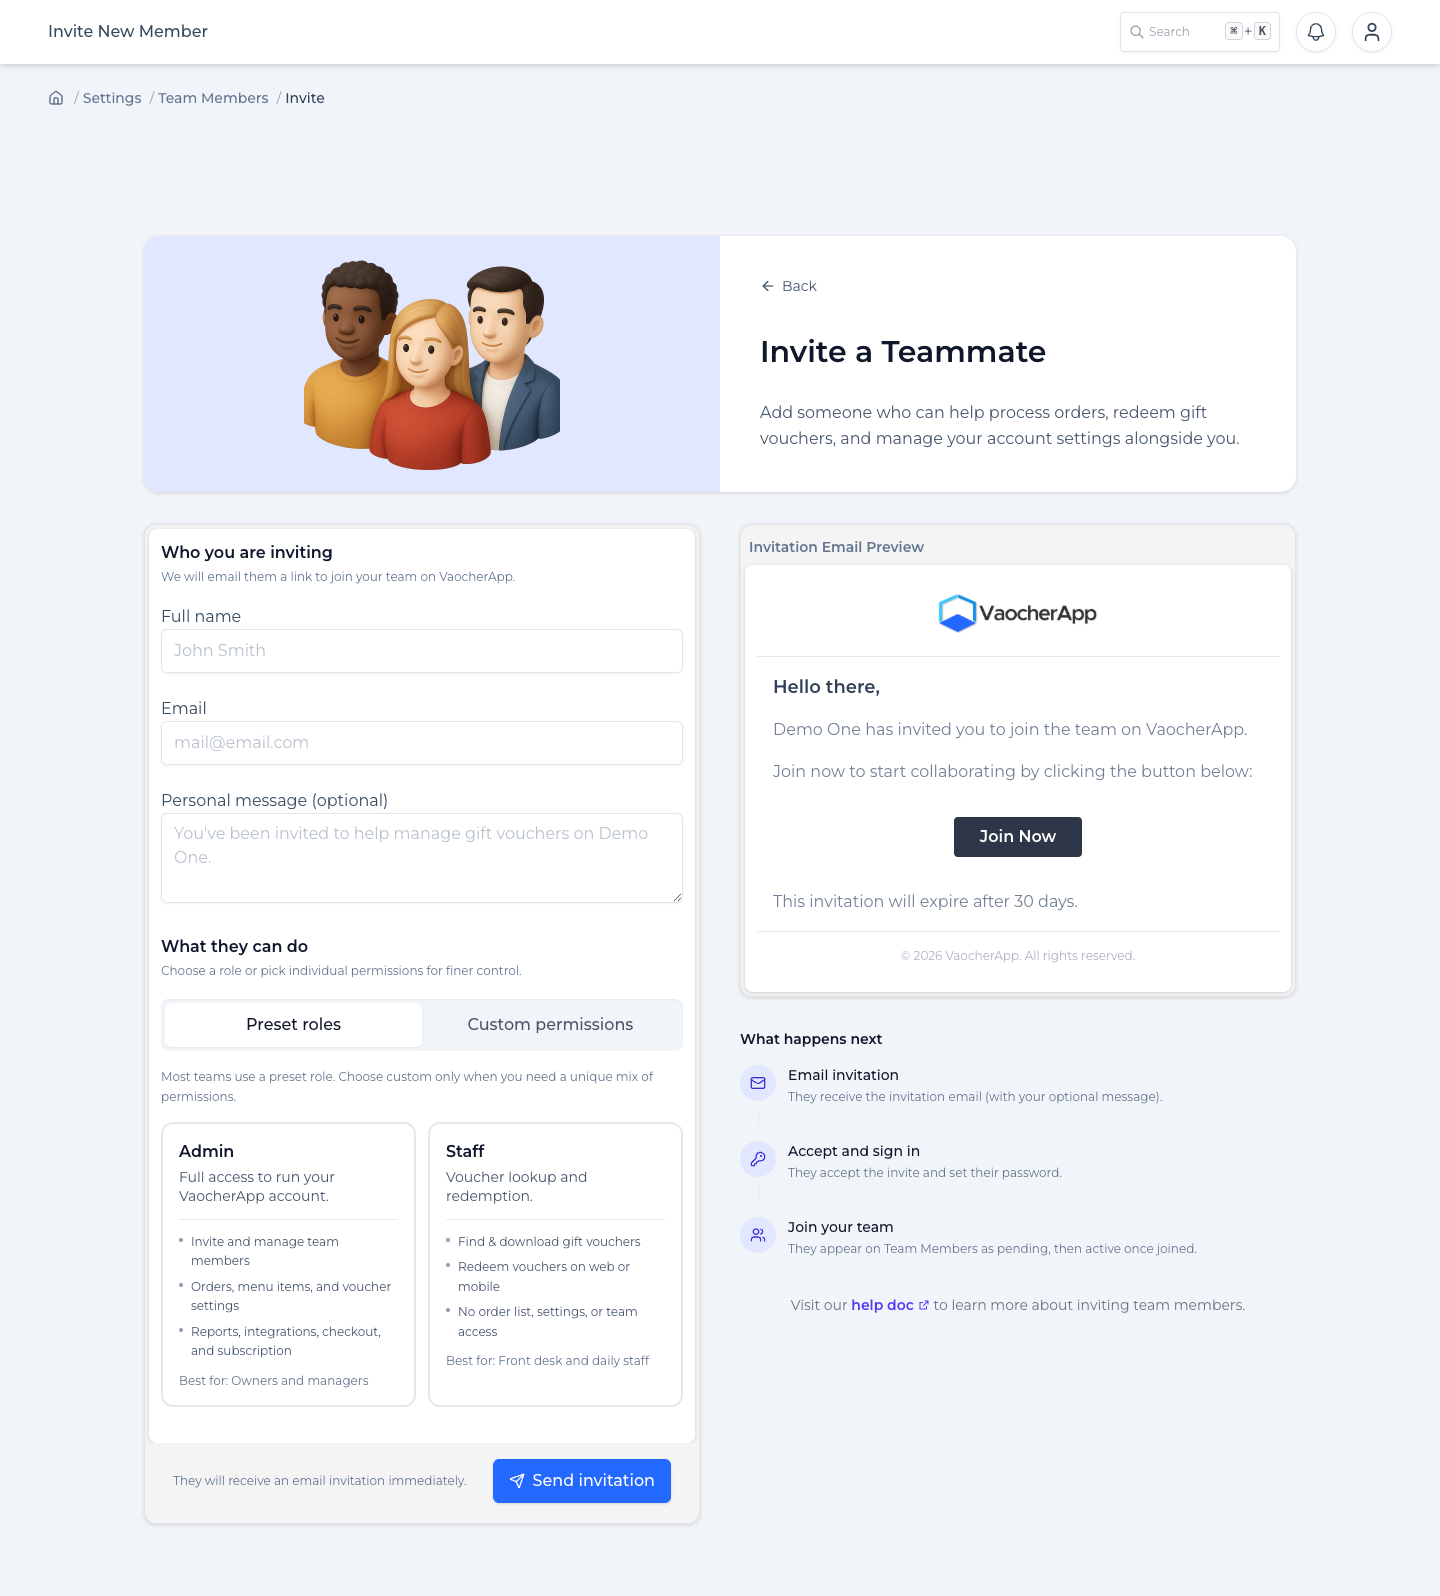
On Invite a Teammate or Edit Member, keep Preset roles selected, then choose a card:
Admin
Tagline: Full access to run your VaocherApp account.
Includes inviting and managing team members, orders, menu items, voucher settings, reports, integrations, checkout, and subscription.
Best for: owners and managers.
Staff
Tagline: Voucher lookup and redemption.
Includes finding and downloading gift vouchers, and redeeming on web or mobile.
Does not include the order list, settings, or team access.
Best for: front desk and daily staff.
Preset roles Admin and Staff on the invite screen
Most teams should stay on Preset roles. The screen notes that custom is only needed when you want a unique mix of permissions.
Custom permissions
Open the invite or edit access screen (from Team Members).
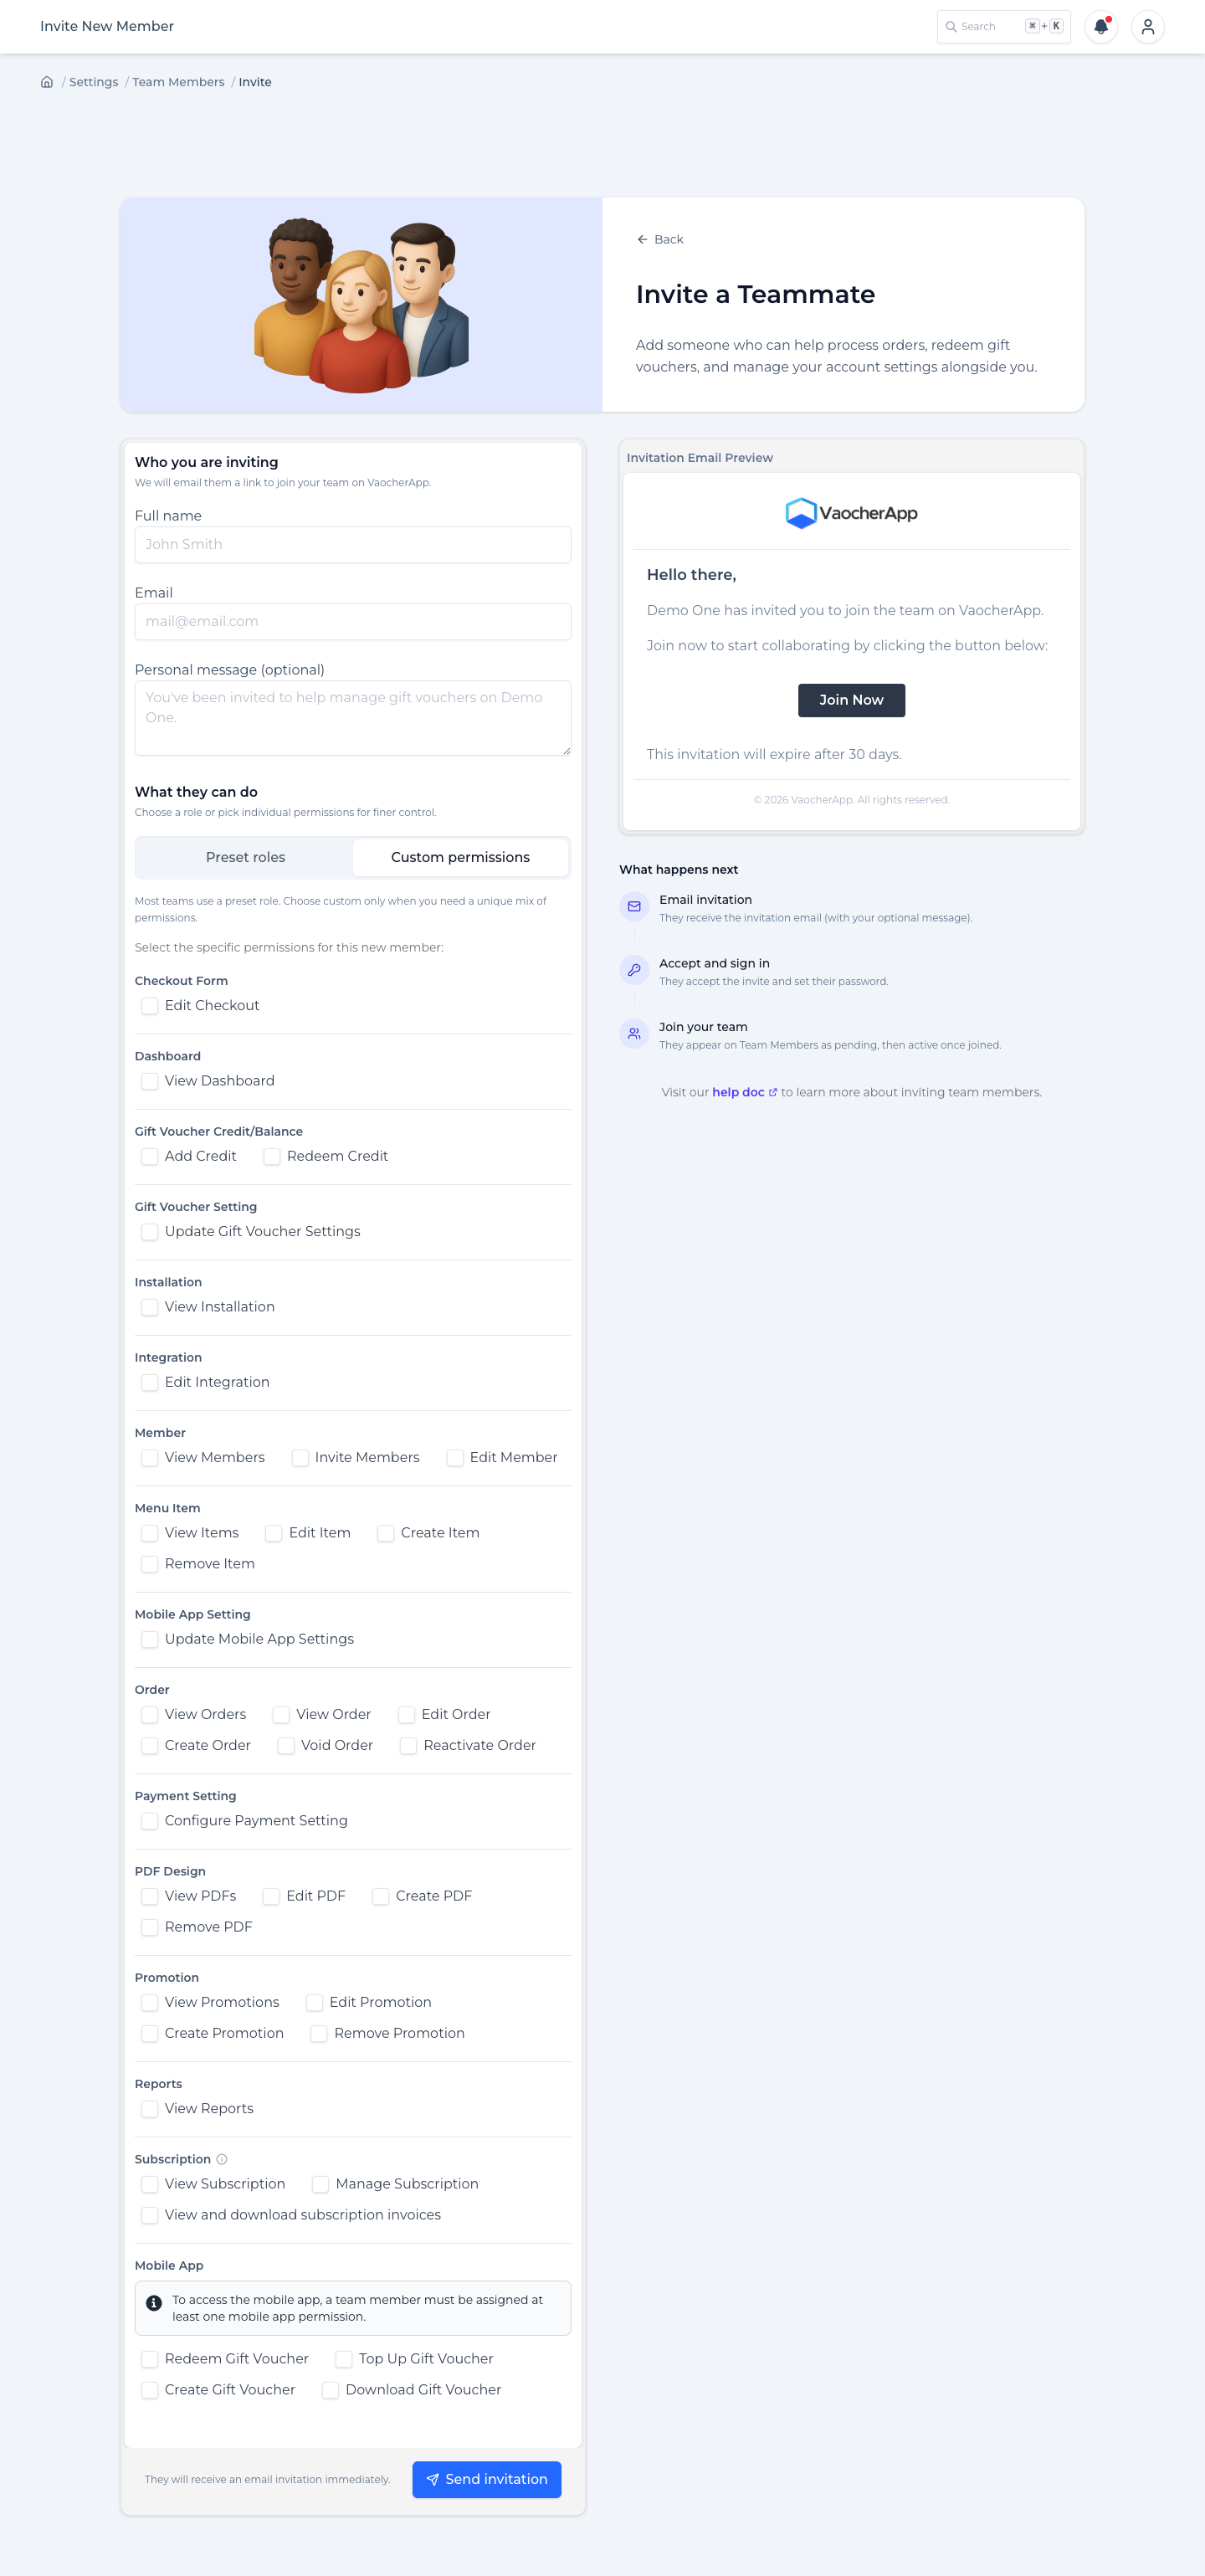
Switch from Preset roles to Custom permissions.
Tick only the permissions this person needs.
Send the invitation or click Save Changes.
Permissions are grouped under headings that match the checklist in the product. Labels below match the checkboxes you see.
Custom permissions checklist including Subscription and Mobile App
Checkout Form
Permission
What it allows
Edit Checkout
Edit the checkout form, shipping, guest notifications, and related checkout settings
Dashboard
Permission
What it allows
View Dashboard
Open the main dashboard overview
Gift voucher credit/balance
Permission
What it allows
Add Credit
Add balance to a gift voucher
Redeem Credit
Redeem balance from a gift voucher
Gift Voucher Setting
Permission
What it allows
Update Gift Voucher Settings
Edit gift voucher settings, wallet pass designs, and custom QR codes
Installation
Permission
What it allows
View Installation
Open installation and embed guides
Integration
Permission
What it allows
Edit Integration
Connect and manage integrations (for example POS)
Member
Permission
What it allows
View Members
Open Team Members
Invite Members
Invite new teammates
Edit Member
Change a member’s access, or revoke access
Menu Item
Permission
What it allows
View Items
Open the menu items list
Edit Item
Edit an existing menu item
Create Item
Create a new menu item
Remove Item
Delete a menu item
Mobile App Setting
Permission
What it allows
Update Mobile App Settings
Edit mobile app settings in the web dashboard
Order
Permission
What it allows
View Orders
Open the Orders list
View Order
Open a gift voucher or order details page (lookup)
Edit Order
Change order details
Create Order
Create new gift voucher orders
Void Order
Void an order
Reactivate Order
Reactivate a voided order
PDF Design
Permission
What it allows
View PDFs
Open PDF design settings
Edit PDF
Edit a PDF design
Create PDF
Create a PDF design
Remove PDF
Delete a PDF design
Payment Setting
Permission
What it allows
Configure Payment Setting
Connect or change payment providers
Promotion
Permission
What it allows
View Promotions
Open the promotions list
Edit Promotion
Edit a promotion
Create Promotion
Create a promotion
Remove Promotion
Delete a promotion
Reports
Permission
What it allows
View Reports
Open reports (for example sales, redemptions, and guest list)
Subscription
Permission
What it allows
View Subscription
Open Settings → Subscription & Billing and see plan details
Manage Subscription
Change plan or billing details in Stripe (for example Manage, add a payment method, or select a plan when needed)
View and download subscription invoices
Open and download subscription invoices from the billing screen
View Subscription is the base access. If you tick Manage Subscription or View and download subscription invoices, View Subscription is selected automatically. If you clear View Subscription, the other two are cleared as well.
Use the info icon next to Subscription in the checklist for a short reminder of this behaviour.
Mobile App
Permission
What it allows
Redeem Gift Voucher
Redeem gift vouchers in the mobile app
Top Up Gift Voucher
Top up gift vouchers in the mobile app
Create Gift Voucher
Create gift vouchers in the mobile app
Download Gift Voucher
Download gift vouchers in the mobile app
To use the mobile app, the member needs at least one Mobile App permission. Without that, they can only work in the web dashboard with the web permissions you gave them.
When to use which option
Option
Use when
Admin
Trusted managers who need full account control, including team and subscription
Staff
Front desk staff who mainly look up and redeem vouchers
Custom permissions
Someone needs a mix that is not covered by Admin or Staff (for example reports but not team invites)
How to check it worked
After invite: the person joins and only sees the areas their role or permissions allow.
After edit: they may be signed out so the new access applies. Ask them to sign in again and confirm the menus they should (and should not) see.